Mold Removal Services Florida: Causes, Risks, and Prevention Strategies for Homes
Mold is a common issue in homes that can lead to significant health risks and structural damage if left untreated. Understanding the causes of mold growth, the associated risks, and ways to prevent it is crucial for maintaining a healthy living environment.
Causes of Mold Growth
Mold thrives in environments where moisture is present.
- Excess Humidity:Prolonged exposure to high humidity levels (above 60%) creates a perfect environment for mold.
- Water Leaks:Leaking pipes, roofs, or appliances can introduce moisture into walls, floors, and ceilings.
- Poor Ventilation:Lack of proper airflow allows humidity to build up in areas like bathrooms and kitchens.
- Flooding:Homes that experience flooding often struggle with mold issues if water is not thoroughly removed and the area properly dried.
- Condensation:In colder climates, condensation on windows or walls can create moisture pockets where mold may develop.
Risks Associated With Mold in Homes
- Health Concerns
Mold spores can trigger various health problems in individuals who are exposed for extended periods. These effects are particularly concerning for people with allergies, asthma, or compromised immune systems. - Respiratory issues (e. g.
- Nasal congestion and sinus irritation
- Skin rashes or itching
- Eye irritation
- Structural Damage
Mold slowly breaks down organic materials such as wood, drywall, and insulation. If not addressed promptly, it can weaken the structural integrity of your home over time. - Decreased Property Value
Visible signs of mold or unresolved moisture problems can significantly reduce the value of your property during resale.
Effective Prevention Strategies
- Use dehumidifiers when necessary to maintain indoor humidity below 50%.
- Regularly monitor damp areas such as basements or laundry rooms using a hygrometer.
- Install exhaust fans in bathrooms and kitchens.
- Open windows periodically to allow fresh air circulation.
- Avoid overcrowding furniture near walls as this limits airflow.
- Fix leaks immediately upon discovery.
- Inspect roofs regularly for damage.
- Dry out flooded areas within 24–48 hours using fans or professional drying equipment.
- Use Mold-Resistant Materials: If building or renovating your home, consider utilizing materials designed to resist mold growth—such as mildew-resistant drywall or paint treatments—for added protection.
- Regular Cleaning Practices: Routine cleaning helps remove potential food sources (like dust) for molds on surfaces prone to dampness:
- Clean bathroom tiles regularly using antifungal solutions.
- Wipe down window sills during colder months to prevent condensation buildup.
| Area | Prevention Strategy | Recommended Frequency |
| Bathrooms | Ensure proper ventilation; clean tiles with antifungal agents | Weekly |
| Kitchens | Use exhaust fans while cooking; check under sinks for leaks | Bi-weekly |
| Basements/Attics | Monitor humidity levels; inspect for leaks & seal cracks | Monthly |
By addressing these key factors—moisture control, proper ventilation, timely maintenance—you can minimize the risk of mold taking root in your living space while safeguarding both health and property investment effectively over time
Effective Mold Removal Florida: How to Identify Signs of Mold Growth in Your Home
Mold growth can be insidious, often developing in hidden areas of your home. Identifying it early is essential to mitigate damage and protect the health of your household. Below are signs and indicators that can help you detect mold effectively.
How to Spot Mold Growth and When to Call a Mold Removal Company Florida
Being vigilant about potential signs of mold is critical.
- Visible Discoloration:
Keep an eye out for unusual stains or spots. - Musty Odor:
A persistent earthy or musty smell in a room could indicate the presence of mold, even if it’s not visible. - Warped or Damaged Surfaces:
Walls, floors, or ceilings that appear warped, bubbled, or deteriorated may suggest moisture issues conducive to mold growth. - Excess Moisture or Water Stains:
Areas with water damage—such as stains on walls or ceilings—or chronic dampness are high-risk zones for mold development.
Understanding Mold Exposure Symptoms and the Need for Water Damage Restoration Florida
Sometimes, physical symptoms experienced by you or your family may point toward hidden mold problems.
- Increased allergy-like symptoms such as sneezing, coughing, itchy eyes, or skin irritation.
- Worsening asthma symptoms in those with pre-existing respiratory conditions.
- Frequent headaches or fatigue without a clear cause.
If these symptoms improve when away from home and worsen upon return, indoor mold may be the culprit.
Uncover Hidden Spots with a Thorough Mold Inspection Florida Experts Trust
Mold doesn’t always grow in obvious locations.
| Location | Why It’s Susceptible |
| Inside walls | Leaks from plumbing inside walls create moist conditions. |
| Under sinks | Persistent leaks in pipes lead to damp cabinets. |
| HVAC systems | Condensation and trapped moisture promote growth here. |
| Beneath carpets | Flooding or spills can result in trapped moisture under carpet padding. |
| Basement corners | Poor ventilation and high humidity levels encourage mold growth here. |
Tools to Help Detect Mold
- Moisture Meters:These measure the level of moisture present in materials like drywall and wood.
- UV Lights:Shine UV lights over dark corners where spotting might not be immediately visible.
- Professional Testing Kits:These kits can help confirm whether suspicious areas contain harmful types of spores.
Key Tips for Regular Checks
- Inspect bathrooms regularly for discoloration near tiles and fixtures.
- Check behind furniture placed against exterior walls; this area is prone to condensation.
- Look out for condensation build-up on windows during colder months.
Identifying mold early not only prevents structural damage but also protects the health of those living within the space. Proactive measures combined with awareness can ensure a safe living environment free from harmful mold complications.
Mold growth in a home is not always obvious, as it can develop in hidden areas or mimic harmless discoloration on surfaces. Identifying mold early is essential to mitigate its effects on health and property. This guide highlights common signs of mold growth and key indicators for homeowners to monitor.
Visual Indicators of Mold
Mold often starts as small spots that may grow larger over time. It can appear in various colors, textures, and patterns depending on the type of mold and the surface it inhabits.
- Black or green spots: These are often seen on walls, ceilings, or other moist surfaces.
- White, powdery stains: Commonly found on organic materials like wood or paper.
- Orange or pink hues: Typically found in bathrooms around sinks, tubs, or shower curtains.
- Fuzzy or slimy textures: This may suggest active mold growth that requires immediate attention.
Musty Odors
A persistent musty or damp smell is one of the most consistent indicators of mold presence. This odor is caused by Microbial Volatile Organic Compounds (MVOCs) released during mold’s metabolic process. If you notice this scent but can’t see any visible mold, it could be hiding behind walls, under carpets, or within HVAC systems.
Physical Symptoms Related to Mold Exposure
Sometimes the first sign of mold isn’t visual but rather physical symptoms experienced by those living in the home.
- Persistent sneezing or nasal congestion
- Irritated throat
- Watery eyes
- Skin rashes
- Worsening asthma symptoms for those with pre-existing conditions
If these issues occur more frequently at home than elsewhere, it could indicate hidden mold growth.
Dampness and Water Damage as Warning Signs
Mold thrives in damp conditions caused by water leaks, condensation, or high humidity levels.
| Potential Problem Areas | Signs to Monitor |
| Leaky roofs | Stains on ceilings |
| Plumbing issues | Moist walls under sinks; warped flooring |
| Window condensation | Water pooling around frames |
| Basement dampness | Discoloration along walls; peeling paint |
Even if no visible mold is present initially, lingering moisture creates an ideal environment for future growth.
Hidden Mold Growth Locations
Some areas prone to mold are less visible during daily routines.
- Behind drywall:Especially near plumbing fixtures.
- Under carpets:Look for discoloration and damp smells.
- Inside HVAC systems:Ducts and filters can harbor spores.
- Attics:Poor insulation may lead to condensation.
Use a flashlight in dark spaces and inspect corners closely when searching for hidden signs.
Tools to Aid Detection
- Use a moisture meter to measure humidity levels in specific spots (ideal levels are between 30–50% indoors).
- Purchase a UV flashlight to detect certain types of fungal activity invisible under normal lighting.
- Consider DIY test kits that collect air samples; however professional testing services offer greater accuracy.
By paying close attention to these signs and using detection tools effectively where needed, homeowners can stay proactive against potential damage caused by unchecked mold development.
Health Risks of Mold Exposure: Understanding the Impact on You and Your Family
Mold exposure can pose significant health risks, particularly for vulnerable groups such as children, the elderly, and individuals with pre-existing health conditions. Understanding these risks is essential to protect your family’s well-being. Below is a detailed overview of the potential health concerns associated with mold exposure.
Common Health Issues Caused by Mold Exposure
Exposure to mold spores can lead to a range of symptoms and medical conditions.
- Respiratory Issues:
Inhaling mold spores may irritate the respiratory system, leading to coughing, sneezing, nasal congestion, and throat irritation. - Allergic Reactions:
People sensitive to mold may experience symptoms such as itchy eyes, skin rashes, or a runny nose. Prolonged exposure can exacerbate these reactions. - Asthma Attacks:
Individuals with asthma are especially at risk when exposed to mold. Mold spores can trigger asthma symptoms such as shortness of breath, wheezing, and chest tightness. - Infections:
Certain types of mold (e. g. , Aspergillus) can cause fungal infections in people with weakened immune systems. These infections may require medical intervention.
Chronic Effects from Prolonged Exposure
- Chronic Respiratory Conditions:Long-term exposure may contribute to conditions like chronic bronchitis or other lung diseases.
- Neurological Symptoms:Some studies suggest that exposure to toxic molds (e. g. , Stachybotrys chartarum) may be linked to neurological effects such as memory loss or difficulty concentrating.
- Immune System Suppression:
Continuous exposure can compromise the immune system’s ability to fight off other pathogens effectively.
| Symptom/Condition | At-Risk Groups | Common Triggers |
| Allergic Reactions | Children & elderly | High humidity, poor ventilation |
| Asthma Symptoms | Asthmatics | Airborne spores |
| Fungal Infections | Immunocompromised people | Black molds like Aspergillus |
| Neurological Symptoms | All groups (rare cases) | Prolonged toxic mold growth |
Who is Most at Risk?
- Infants and Young Children:Their developing immune systems make them more vulnerable.
- Elderly Individuals:Aging often weakens immunity and respiratory function.
- Immunocompromised Individuals:Those undergoing chemotherapy or living with chronic illnesses like HIV/AIDS are at heightened risk.
- People with Pre-existing Respiratory Conditions:Conditions such as asthma or Chronic Obstructive Pulmonary Disease (COPD) increase sensitivity.
Steps to Reduce Health Risks
- Maintain indoor humidity levels between 30%–50%.
- Fix leaks promptly in roofs, windows, or plumbing systems.
- Use air purifiers equipped with HEPA filters.
- Ensure proper ventilation in high-moisture areas like bathrooms and kitchens.
- Regularly inspect areas prone to dampness (e. g. , basements).
By understanding how exposure can impact your family’s health and taking preventive actions proactively, you will be better equipped to maintain a safe home environment for everyone involved.
How to Test for Mold in Your Home: Methods for Accurate Detection
Testing for mold in your home is an essential step to ensure a safe and healthy living environment. Mold can grow unnoticed, often hidden behind walls or under surfaces, making it vital to identify its presence accurately. Below, we outline the most effective and reliable methods for detecting mold in your home.
Visual Inspection
The first step in identifying mold is conducting a thorough visual inspection of your home.
- Bathrooms (around showers, bathtubs, and sinks)
- Kitchens (beneath sinks, near dishwashers, and behind refrigerators)
- Basements (walls, floors, and corners)
- Attics (roof leaks or improperly ventilated spaces)
- Windowsills and frames
Indicators of mold include discoloration such as black, green, or white patches on surfaces. Keep an eye out for signs of water damage like peeling paint or warped drywall.
Using Your Sense of Smell
Mold often has a distinctive musty odor that can alert you to its presence even before it becomes visible. If you notice persistent damp smells in certain areas of your home, consider investigating further.
DIY Mold Testing Kits
Homeowners can opt for DIY mold testing kits available at hardware stores or online retailers. These kits typically involve collecting samples using swabs or settling plates to capture airborne spores. While convenient and cost-effective, note that these tests may not always provide detailed or accurate results without professional interpretation.
Steps for Using a DIY Kit:1. Follow the instructions included with the test kit. 2. Collect samples from suspected mold-prone surfaces or areas. 3. Send collected samples to the designated laboratory (if required). 4. Review the lab report to confirm mold presence.
Professional Mold Testing Services
For highly accurate detection and analysis of mold growth in your home, hiring a certified professional Florida mold removal company is recommended.
- Air Quality Testing:Measures the concentration of airborne spores using air samplers.
- Surface Sampling:Identifies mold on visible surfaces through swabs or tape-lift methods.
- Bulk Sampling:Involves testing pieces of affected materials like drywall or insulation.
- Infrared Cameras:Detect hidden moisture behind walls or ceilings that could indicate unseen mold growth.
Hiring professionals ensures a comprehensive evaluation by identifying not only the visible mold but also hidden colonies that might go undetected through basic methods.
| Detection Method | Cost Range | Accuracy | Suitable For |
| Visual Inspection | Free | Moderate | Initial examination |
| DIY Mold Test Kits | $10 – $50 | Low to Moderate | Small-scale preliminary testing |
| Professional Mold Testing | $300 – $1,000+ | High | Extensive analysis |
When Should You Test for Mold?
Testing should be performed under specific circumstances such as: – After experiencing water damage from leaks or floods – If household members exhibit unexplained allergy-like symptoms – Before purchasing a new property – Following remediation efforts to confirm eradication
By understanding how to accurately detect mold through these methods, homeowners can take proactive steps toward resolving potential issues before they escalate into health hazards or structural damage concerns.
Effective Tips for Mold Remediation Florida Homeowners Can Use
Removing mold from your home is essential for maintaining a healthy environment. Mold not only damages your property but also poses health risks, especially for individuals with allergies, asthma, or weakened immune systems. Below are the best methods and strategies for safely and effectively removing mold from your home.
Step 1: Assess the Extent of the Mold Issue
Before beginning any mold removal process, evaluate how widespread the contamination is. Small areas of mold (less than 10 square feet) are usually manageable through DIY methods, but larger infestations may require professional remediation.
- Small mold problem: Can often be handled using household solutions.
- Large-scale mold problem: Requires professionals equipped with specialized tools and protective equipment.
Step 2: Gather Necessary Supplies
- Gloves (preferably rubber or nitrile)
- Safety goggles
- N95 respirator mask to prevent inhalation of spores
- White vinegar or hydrogen peroxide (natural cleaning agents)
- Commercially available mold removers
- Detergent and warm water
- Scrub brush or sponge
- Spray bottle or clean cloths
- Garbage bags for disposing of contaminated materials
Step 3: Contain the Area
Prevent mold spores from spreading to other parts of your home by sealing off the affected area.
- Close doors leading to unaffected areas.
- Use plastic sheeting and tape to cover vents, windows, and doorways.
- Place fans strategically to ventilate air outdoors during cleanup.
Step 4: Cleaning Techniques by Surface Type
The method you choose will depend on the type of surface where mold has developed.
| Surface Type | Recommended Method |
| Hard surfaces | Scrub with a mixture of detergent and water; follow up with vinegar spray. |
| Porous materials | Discard heavily infested items like carpets or insulation that cannot be cleaned. |
| Wood | Lightly sand affected areas if damage is minimal; apply antifungal treatments. |
| Fabric | Wash in hot water using detergent; dry completely before reuse. |
Step 5: Drying Thoroughly
After cleaning, ensure all surfaces are completely dry to prevent regrowth.
- Use fans or dehumidifiers in rooms where moisture tends to linger.
- Open windows when weather permits to increase ventilation.
Step 6: Prevent Future Mold Growth
- Fix leaks immediately—whether they occur in pipes, roofs, or basements.
- Use a dehumidifier in damp spaces like basements or bathrooms.
- Keep indoor humidity levels between 30–50%, as higher humidity promotes mold growth.
- Regularly inspect areas prone to moisture buildup (e. g. , under sinks).
By following these steps carefully, you can eliminate current infestations while reducing the likelihood of future problems related to mold growth in your living spaces.
Mold vs.
Mold and mildew are often thought of as interchangeable, but they are distinct types of fungi with different characteristics, growth patterns, and removal methods. Understanding the differences between mold and mildew is critical for developing effective removal strategies that protect your home and health.
Key Differences Between Mold and Mildew
| Characteristic | Mold | Mildew |
| Appearance | Typically appears fuzzy or slimy; comes in various colors such as black, green, or blue. | Appears powdery or fluffy; usually white, gray, or yellow. |
| Growth Pattern | Can grow deeper into materials like wood, drywall, or carpet. | Grows on flat surfaces like bathroom tiles or windowsills. |
| Odor | Produces a strong musty smell. | May have a milder musty odor. |
| Health Impact | Can cause significant respiratory issues and allergic reactions over time. Certain types (e.g., black mold) are toxic. | Generally less harmful but can still trigger allergies in sensitive individuals. |
Why These Differences Matter
- Identification:Knowing whether you’re dealing with mold or mildew helps determine the appropriate cleaning technique and prevent further spread.
- Health Risks:Mold is more hazardous to health compared to mildew due to its ability to produce mycotoxins.
- Removal Methods:Mold often requires professional remediation, while mildew can typically be cleaned with household products.
Where Mold and Mildew Grow
- Basements
- Attics
- Behind walls (especially after water damage)
- Under carpets
- HVAC systems
- Bathroom grout
- Shower curtains
- Windowsills
- Plant leaves
How to Address Them Effectively
Whether you’re dealing with mold or mildew, addressing the problem promptly is essential to minimize damage to your home and risk to your health.
- Use a solution of equal parts water and vinegar or a commercial mildew remover.
- Scrub affected areas with a soft brush.
- Dry the surface thoroughly after cleaning.
- Wear protective gear such as gloves, goggles, and an N95 mask before attempting removal.
- For small areas (less than 10 square feet), use a solution of bleach mixed with water (1 cup bleach per gallon of water) to clean hard surfaces.
- Larger infestations should be handled by certified mold remediation professionals.
Preventing Future Growth
- Maintain indoor humidity levels below 50% using dehumidifiers if necessary.
- Ensure proper ventilation in moisture-prone rooms like bathrooms, kitchens, and laundry areas.
- Fix leaks promptly in roofs, pipes, or appliances to prevent excess moisture buildup.
- Regularly clean potential growth spots such as shower grout lines or window frames.
By properly identifying whether you are dealing with mold or mildew and employing targeted strategies for their removal and prevention, you can protect your home from damage while safeguarding the health of everyone who lives there.
- Mold Removal Services Florida: Causes, Risks, and Prevention Strategies for Homes
- Comprehensive Guide to Mold Remediation Florida: Process and Benefits
- Effective Mold Remediation Florida Techniques for Completely Eliminating Mold
- Mold Remediation Florida: Protecting Your Health and Well-Being
- The Top 8 Questions to Ask Before Hiring a Mold Removal Florida Expert
- Comprehensive Guide to Mold Remediation Florida Homeowners Can Trust
- 6 Essential Steps to Expect During Mold Removal Services Florida
- Effective Mold Remediation Florida: Solutions for a Healthier Home
- Mold Remediation Florida: Effective Strategies for Eliminating Mold in Your Home
Comprehensive Guide to Mold Remediation Florida: Process and Benefits

Mold remediation is a critical process for addressing mold infestations in residential, commercial, and industrial spaces. Left unchecked, mold can cause significant structural damage, impact indoor air quality, and trigger a variety of health problems. This section provides an overview of the mold remediation process and explores its key benefits, helping property owners understand its importance.
What is Mold Remediation?
Mold remediation refers to the process of identifying, containing, removing, and preventing mold growth in buildings. It goes beyond simply cleaning visible mold; instead, it addresses the underlying causes of moisture that allow mold to thrive. This ensures not only the elimination of existing mold but also reduces the risk of regrowth.
- Inspection and assessment: Determining the extent of mold growth.
- Containment: Isolating affected areas to prevent spreading.
- Filtration: Utilizing specialized equipment to capture airborne spores.
- Removal: Safely extracting contaminated materials.
- Cleaning and sanitization: Treating surfaces with antimicrobial solutions.
- Prevention strategies: Addressing underlying moisture issues.
Key Benefits of Professional Mold Remediation
- Mold releases allergens and irritants into the air that can exacerbate respiratory conditions such as asthma or allergies. Remediation improves air quality by removing harmful spores from your home or workplace.
- Mold thrives on organic materials like wood, drywall, and insulation. Over time, it can weaken these materials, leading to costly repairs. Timely remediation prevents further damage to your property’s structural components.
- Exposure to indoor mold has been linked to numerous health issues such as coughing, wheezing, nasal congestion, skin irritation, and even serious infections in individuals with weakened immune systems. By removing both visible colonies and airborne spores, professional remediation helps reduce these risks significantly.
- Addressing a small infestation promptly through professional remediation is far less expensive than dealing with large-scale damage caused by prolonged neglect or incorrect DIY attempts at removal.
- Professional services often include a thorough inspection that identifies sources of moisture—such as leaks or poor ventilation—that are contributing factors in mold development.
Common Myths About Mold Removal vs Remediation
| Myth | Reality |
| DIY cleaning methods are effective | Surface cleaning often leaves spores behind; proper equipment is required for complete removal |
| Bleach kills all types of molds | While bleach may remove surface stains temporarily, it does not address deeper underlying root systems |
| Small amounts don’t require attention | Even small growths can spread quickly if not properly contained |
Why You Should Avoid DIY Solutions
- Without proper containment measures in place during cleanup activities (e.g., sealing off areas), disturbed spores can spread further into unaffected regions.
- Store-bought solutions often fail at eradicating spore colonies adequately due lack chemical specificity/tools .
Relying instead upon certified professionals ensures peace-of-mind knowing work properly performed meeting industry-standard safe/lasting results
Comprehensive Guide to Mold Removal Services Florida
Mold remediation is a structured and thorough process designed to eliminate mold from indoor spaces and restore healthy air quality. Below, we break down the key steps involved in ensuring safe and effective mold remediation.
Initial Inspection and Assessment by a Mold Removal Company in Florida
- Moisture meters: To detect damp areas behind walls or under flooring.
- Thermal imaging cameras: To locate hidden water damage.
- Air sampling equipment: To measure airborne mold spore concentrations.
Once the assessment is complete, a clear remediation plan tailored to the size and scope of contamination is developed.
Effective Containment Strategies for Water Damage Restoration Florida
- Sealing off affected areas with plastic sheeting or barriers.
- Establishing negative air pressure to keep spores contained.
- Turning off HVAC systems to avoid contamination spreading through vents.
This ensures that unaffected areas remain safe while work proceeds.
Air Filtration Process During Mold Inspection Florida
High-efficiency particulate air (HEPA) filters are used at this stage to capture fine mold spores circulating in the air. HEPA vacuum systems clean surfaces by trapping microscopic particles, while air scrubbers purify the surrounding environment for better indoor air quality.
Mold Removal
- Drywall
- Insulation
- Carpeting
Nonporous items like metal or glass surfaces are thoroughly cleaned using industry-approved antimicrobial solutions to ensure complete decontamination.
Moisture Control & Repairs
- Fixing leaky plumbing.
- Sealing foundation cracks.
- Improving ventilation in humid spaces like bathrooms or basements.
Repairs may also involve replacing drywall, repainting surfaces with mold-resistant paint, or installing dehumidifiers as preventive measures against future outbreaks.
| Step | Key Action | Tools/Measures Used |
| Inspection | Identify extent & source of infestation | Moisture meters, air samples |
| Containment | Prevent spread of spores | Barriers, negative pressure |
| Air Filtration | Remove airborne contaminants | HEPA filters & scrubbers |
| Mold Removal | Eliminate visible colonies & irreparable materials | Antimicrobial cleaning agents |
| Moisture Control | Address water issues & implement prevention strategies | Plumbing repairs, dehumidifiers |
By following these systematic steps during remediation efforts, you can address existing issues effectively while reducing health risks and long-term damage caused by unchecked mold growth.

Expert Mold Removal Florida: Comprehensive Inspection and Assessment Services
A proper inspection and assessment are critical first steps in addressing mold issues. Without a thorough understanding of the problem’s scope, attempting to remediate mold can be ineffective or even counterproductive. Here’s how these crucial steps are carried out.
Initial Visual Assessment
During the initial inspection, professionals carefully examine areas that are prone to moisture accumulation, such as:
– Bathrooms
– Kitchens
– Basements and crawl spaces
– Attics
– HVAC systems
The presence of visible mold growth is noted, but that’s not where the investigation ends. Mold often grows in hidden areas, which necessitates more detailed examination techniques.
Use of Specialized Detection Equipment
| Tool | Purpose |
| Moisture Meters | Measure moisture levels in walls, ceilings, and floors to identify damp areas. |
| Infrared Cameras | Detect temperature differences indicating trapped moisture behind surfaces. |
| Air Sampling Kits | Analyze air quality to measure the concentration of mold spores. |
These tools allow professionals to pinpoint areas that require remediation even if no visible signs of mold are present.
Identifying Mold Species Through Testing
In some cases, samples are taken from affected areas for laboratory testing. This helps identify specific types of molds present in your home or workspace. Understanding the species is especially important if toxic molds like Stachybotrys chartarum (commonly known as black mold) are suspected.
Types of tests professionals may use:
1. Air Sampling – Measures airborne spore levels indoors compared to outdoors for baseline comparison.
2. Surface Testing – Involves swabbing or tape lifting from a contaminated surface for lab analysis. 3. Bulk Testing – Analyzes pieces of material from areas heavily infested with mold.
Evaluating Underlying Causes
It’s essential not only to identify where mold exists but also why it developed in the first place. Common contributing factors include: – Leaking pipes or fixtures – Poor ventilation – Flooding incidents – Roof leaks or structural damage
Addressing these underlying issues ensures long-term success in preventing future outbreaks.
Documenting Findings for Transparency
Reputable remediation services will document their findings through detailed written reports, photographs, and sometimes video footage. This step provides transparency and allows property owners to understand the scale of the problem before proceeding with remediation efforts.
By performing a comprehensive inspection and assessment, homeowners and business owners gain valuable information about affected areas, potential health risks associated with exposure, and strategies for addressing both current infestations and future prevention. This step lays the foundation for an effective remediation process tailored specifically to your needs.
Containment Strategies to Effectively Limit Mold Damage
When dealing with mold contamination, one of the most critical steps is containment. Proper containment strategies help prevent mold spores from spreading to unaffected areas, reducing the likelihood of further damage and health risks. Below, we explore effective techniques and practical measures for limiting mold damage during remediation.
Why Containment is Crucial
- Mold spores can invade clean parts of your property.
- Health risks may increase due to exposure in unaffected areas.
- Remediation efforts become more time-consuming and expensive.
Effective containment ensures that the problem area remains isolated while work is underway, thereby maintaining a controlled environment.
Key Containment Approaches
- Use plastic sheeting (6-mil polyethylene or thicker) to block off contaminated zones.
- Secure edges with heavy-duty tape to create an airtight seal.
- Cover vents, doors, and windows leading out of the affected space.
- Establishing Negative Air Pressure
Negative air pressure prevents airborne spores from escaping into adjacent spaces: - Install HEPA-filtered ventilation systems within the contained area.
- Direct airflow outside via exhaust fans or ducts.
- Monitor pressure levels using specialized equipment for accuracy.
- Using Physical Barriers
When practical, physical barriers such as temporary walls or partitions can be erected to provide additional layers of separation between contaminated and clean areas. - Creating Clean Zones
A “clean zone” acts as a buffer between contaminated spaces and surrounding rooms: - Equip this zone with decontamination equipment like shoe covers and disposable suits.
- Ensure workers clean their tools and clothing before leaving the area.
Tools for Effective Containment
| Tool/Material | Purpose | Example Use Case |
| Plastic Sheeting | Isolates zones | Covering doorways or sealing air vents |
| HEPA-Filtered Air Scrubbers | Filters airborne particles | Maintaining negative air pressure |
| Industrial Duct Tape | Secures plastic barriers | Taping edges of sealed-off sections |
| Decontamination Chambers | Provides a safe transition space | Preventing cross-contamination |
Best Practices for Maintaining Containment
- Minimize foot traffic in and out of affected areas.
- Regularly inspect barriers for breaks or tears; repair them immediately if needed.
- Use disposable tools where possible to prevent contamination spread.
- Train workers on proper hygiene practices, including wearing protective gear consistently.
By adhering to these containment strategies, you not only limit mold damage but also create a safer environment for all occupants until complete remediation is achieved.
Thorough Filtration and Removal of Harmful Mold Spores
Effective mold remediation depends heavily on thorough filtration and the removal of harmful mold spores. Mold spores are microscopic, lightweight particles capable of spreading through the air and settling on various surfaces. If not properly addressed, these spores can lead to recurring mold growth and pose significant health risks. Below is an in-depth guide to understanding filtration techniques, tools used, and best practices for comprehensive mold spore removal.
Why Filtration is Crucial in Mold Remediation
- Preventing the spread of spores: Proper filtration ensures that airborne spores are captured before they travel to uncontaminated areas.
- Improving indoor air quality: Removing harmful particles from the air reduces allergens and irritants that trigger health problems like asthma or respiratory issues.
- Supporting containment efforts: Effective filtration works hand-in-hand with containment strategies to isolate affected areas.
Key Tools for Mold Spore Filtration
| Equipment | Purpose |
| HEPA (High-Efficiency Particulate Air) Filters | Capture 99.97% of airborne particles as small as 0.3 microns, including mold spores. |
| Negative Air Machines | Create a vacuum effect within a contained space to prevent spore dispersal. |
| Air Scrubbers | Continuously filter indoor air to reduce airborne contaminants during remediation work. |
Steps for Effective Mold Spore Filtration and Removal
- Isolate the Area
Before beginning filtration, ensure that containment barriers such as plastic sheeting or negative air pressure systems are in place to prevent cross-contamination. - Deploy HEPA Filters
Use vacuum cleaners equipped with HEPA filters to remove settled spores from surfaces like carpets, furniture, and walls. - Activate Negative Air Pressure Systems
Install negative air machines connected to exhaust hoses leading outdoors to ensure continuous airflow out of the contaminated area. - Run Air Scrubbers
Position air scrubbers strategically within the space for optimal airflow circulation while capturing airborne particles effectively. - Repeat Cleaning Cycles
Multiple cleaning cycles may be necessary depending on contamination levels detected during initial assessments.
Best Practices for Safe Filtration
- Replace HEPA filters regularly during prolonged remediation projects to maintain efficiency.
- Use personal protective equipment (PPE), such as N95 masks or respirators, when working near contaminated areas.
- Monitor humidity levels using a hygrometer since high moisture environments encourage continued spore activity.
- Dispose of collected debris securely in sealed plastic bags according to local waste management regulations.
Benefits Gained from Proper Spore Removal
- The risk of future mold outbreaks is significantly reduced.
- The environment becomes healthier for occupants by minimizing respiratory irritants.
- Homeowners can enjoy peace of mind knowing their property has been restored safely and effectively.
By integrating advanced filtration technologies with a detailed approach, professionals ensure that all traces of harmful mold spores are eliminated efficiently while safeguarding both health and property integrity throughout the process.

Safe Removal, Cleaning, and Disposal of Contaminated Materials During Mold Remediation
When addressing a mold infestation, the removal, cleaning, and disposal of contaminated materials play a vital role in ensuring the space is safe and free from harmful mold spores. This step not only eliminates existing mold colonies but also prevents further spread or recurrence. Below is an in-depth look at the safe practices involved in this crucial stage of mold remediation.
Identifying Contaminated Materials
- Drywall: Often porous and can harbor deep-seated mold colonies.
- Carpets and Rugs: Mold can thrive in fibers if moisture has been present for an extended period.
- Wooden Structures: Depending on the extent of damage, wood may need cleaning or replacement.
- Furniture: Upholstered furniture is especially susceptible to contamination.
- Insulation: Once compromised by moisture and mold, insulation typically cannot be salvaged.
A thorough inspection using moisture meters and visual assessments should guide decisions on what needs to be cleaned versus discarded.
Proper Removal Techniques
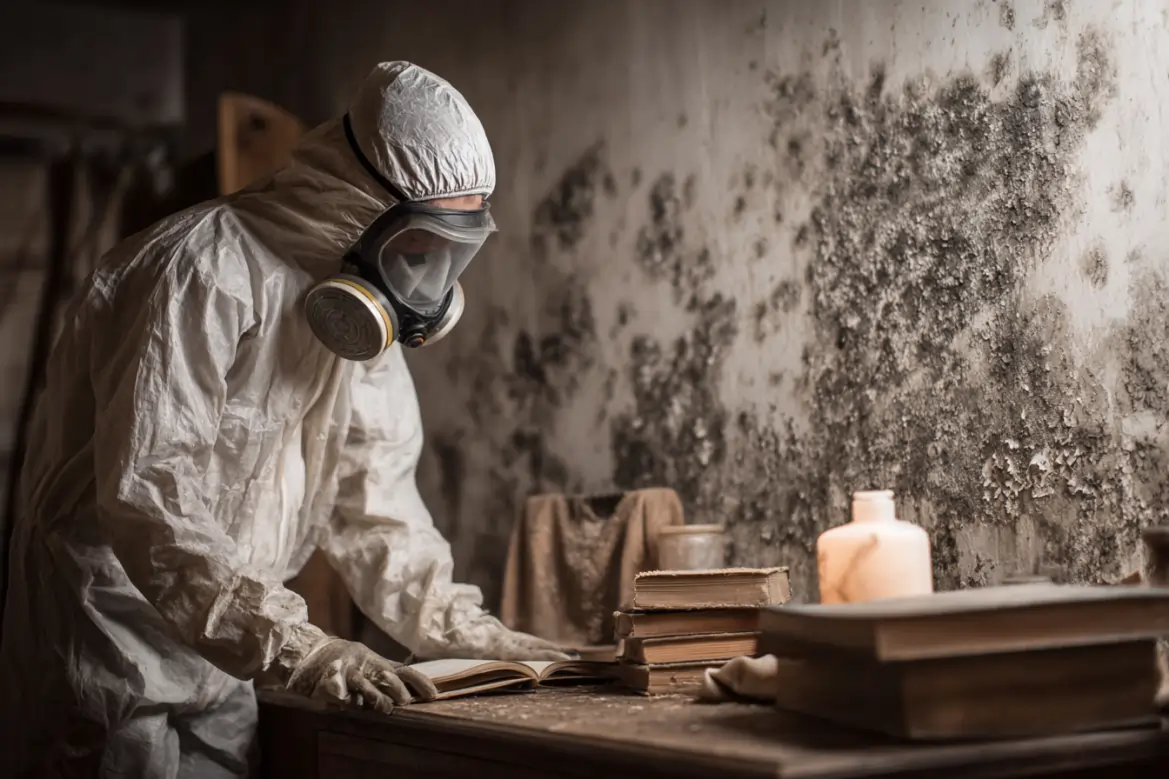
- Wear Protective Gear: Anyone handling contaminated materials should wear personal protective equipment (PPE) such as gloves, N95 masks or respirators, goggles, and coveralls.
- Isolate the Area: Establish containment zones using plastic sheeting and negative air pressure systems to limit cross-contamination.
- Remove porous items like drywall in manageable sections to reduce spore release.
- Use sealed bags for small debris pieces immediately after removal.
- Avoid excessive cutting or sawing during removal processes to limit airborne particles.
Cleaning Mold-Affected Surfaces
- Use detergent solutions specifically designed for mold-removal purposes.
- Apply an EPA-approved antimicrobial treatment after initial cleaning to kill any lingering spores.
| Material Type | Recommended Action |
| Non-Porous Surfaces | Scrub with detergent or bleach solution |
| Semi-Porous Surfaces | Clean thoroughly; apply sealant if needed |
| Heavily Damaged Items | Dispose safely |
Safe Disposal Practices
- Place all contaminated materials into heavy-duty plastic bags immediately after removal.
- Seal bags tightly using duct tape before moving them out of the containment zone.
- Dispose of sealed bags according to local regulations for hazardous waste.
Why Prioritizing Safety Matters
Failing to follow safety protocols during this process can lead to further exposure risks—both for individuals involved directly in remediation activities as well as those occupying the property post-removal. By adhering strictly to established guidelines for handling contaminated materials, you ensure a cleaner environment while protecting health.
By implementing thorough cleaning procedures alongside careful disposal methods, you lay the foundation for a successful mold remediation effort that effectively mitigates long-term risks associated with microbial growth indoors.
How Professional Mold Remediation Reduces Health Risks Linked to Mold Exposure
Mold growth in your home or workplace is not just an aesthetic issue; it poses serious health risks that can impact individuals of all ages. Exposure to mold spores, especially in large quantities, can cause or exacerbate a range of health problems. Professional mold remediation services are specifically designed to address these risks by providing safe and effective solutions. Here’s how expert intervention helps protect your health.
Understanding the Health Risks of Mold Exposure
- Respiratory Issues: Prolonged exposure to mold spores can lead to symptoms like coughing, sneezing, wheezing, and shortness of breath.
- Allergic Reactions: People with mold sensitivities may experience itchy eyes, runny nose, skin rashes, or severe reactions like asthma attacks.
- Immune System Impact: Individuals with weakened immune systems—such as the elderly or those undergoing medical treatments—are at heightened risk for fungal infections caused by mold.
- Chronic Conditions: Long-term exposure has been linked to more severe health issues like sinus infections or hypersensitivity pneumonitis.
How Professional Services Address Health Concerns
- Comprehensive Inspection and Identification
Professionals use advanced tools such as moisture meters and thermal imaging cameras to detect hidden moisture sources and identify areas affected by mold. Early detection helps prevent further spread. - Safe Containment Practices
To prevent spores from spreading during removal efforts, professionals establish containment zones using barriers like plastic sheeting and negative air pressure machines. This ensures that unaffected areas remain safe. - Air Filtration Systems
High-efficiency particulate air (HEPA) filters are used during remediation to capture microscopic spores floating in the air. This process significantly improves indoor air quality by removing harmful particles. - Thorough Cleaning Techniques Specialists employ industry-grade cleaning agents and techniques that effectively neutralize active molds without causing harm to occupants or surfaces.
The Role of Prevention Post-Remediation
| Prevention Tip | Description |
| Control Humidity Levels | Maintain indoor humidity below 60% using dehumidifiers or ventilation fans |
| Fix Leaks Promptly | Repair leaks in roofs, pipes, or windows before they lead to water damage |
| Regular Inspections | Schedule routine checks for potential moisture buildup |
| Proper Ventilation | Ensure proper airflow in bathrooms, kitchens, and basements |
Benefits for Vulnerable Groups
- Children: Their developing respiratory systems make them highly susceptible.
- Elderly People: Age-related immune system decline increases their risk.
- Individuals with Allergies/Asthma: Pre-existing conditions can worsen due to prolonged exposure.
For these demographics especially, professional remediation is non-negotiable when it comes to creating a safe living environment.
By investing in professional services, you’re not only addressing current contamination but also safeguarding long-term health outcomes for everyone in your space through strategic interventions focused on both removal and prevention strategies.
Expertise and Knowledge
- Identifying different types of molds and understanding their specific risks.
- Conducting thorough inspections to pinpoint not just visible mold but hidden growth as well.
- Diagnosing the underlying causes of mold, such as water leaks or humidity problems.
This technical knowledge allows them to target both the immediate problem and its source, ensuring comprehensive remediation.
Use of Advanced Tools and Techniques
- High-efficiency particulate air (HEPA) filters to trap airborne spores during removal.
- Moisture meters for locating hidden damp areas that promote mold growth.
- Negative air machines to isolate contaminated spaces during remediation.
By leveraging advanced technology, they can ensure that every trace of mold is eliminated safely.
Health Protection
- Using personal protective equipment (PPE) during cleanup procedures.
- Containing affected areas to prevent cross-contamination in other parts of your home.
- Safely removing hazardous materials without spreading spores into the air.
Their adherence to safety protocols reduces the chance of prolonged exposure for you and your family.
Long-Term Prevention Strategies
| Prevention Strategy | Description |
| Moisture Control | Addressing leaks, humidity issues, or ventilation problems. |
| Material Replacement | Replacing contaminated drywall, insulation, or carpets. |
| Education for Homeowners | Providing tips on maintaining low moisture levels indoors. |
Such preventive measures ensure your home remains a safe environment over time.
Compliance with Industry Standards
Professional services adhere to strict guidelines established by organizations like the Environmental Protection Agency (EPA) or Institute of Inspection Cleaning and Restoration Certification (IICRC). This ensures high standards for safety and efficacy are maintained throughout the process.
Cost Efficiency Over Time
While DIY attempts might appear less expensive upfront, they often lead to incomplete remediation, resulting in recurring issues that require repeated efforts or repairs. Professionals provide long-term solutions that save money in the long run by addressing the problem holistically.
Hiring professional mold remediation services provides peace of mind by offering expert knowledge, advanced tools, safety compliance, and preventive strategies aimed at creating a healthier living space for you and your family.
- Mold Removal Services Florida: Causes, Risks, and Prevention Strategies for Homes
- Comprehensive Guide to Mold Remediation Florida: Process and Benefits
- Effective Mold Remediation Florida Techniques for Completely Eliminating Mold
- Mold Remediation Florida: Protecting Your Health and Well-Being
- The Top 8 Questions to Ask Before Hiring a Mold Removal Florida Expert
- Comprehensive Guide to Mold Remediation Florida Homeowners Can Trust
- 6 Essential Steps to Expect During Mold Removal Services Florida
- Effective Mold Remediation Florida: Solutions for a Healthier Home
- Mold Remediation Florida: Effective Strategies for Eliminating Mold in Your Home
Effective Mold Remediation Florida Techniques for Completely Eliminating Mold

Mold can pose significant health risks and damage to property if not addressed promptly. Employing the correct mold removal techniques is essential to ensure effective remediation and prevent recurrence. Below is a comprehensive guide detailing various approaches to eliminating mold, including both physical and chemical methods.
1. Identify the Scope of the Problem
Before tackling mold, it is crucial to assess the extent of contamination. Conduct a thorough inspection of your property by:
– Checking damp or humid areas such as basements, bathrooms, and kitchens.
– Inspecting walls, ceilings, carpets, and furniture for discoloration or musty odors.
– Using moisture meters or thermal imaging tools for hidden mold detection.
If the affected area exceeds 10 square feet or involves major structural components (e.g., HVAC systems), professional remediation services may be required.
2. Isolate the Affected Area
To prevent mold spores from spreading during cleanup:
– Seal off contaminated spaces using plastic sheets and tape.
– Turn off HVAC systems in the area to avoid airborne particle circulation.
– Use negative air machines when handling larger infestations.
3. Physical Mold Removal Methods
- a) Scrubbing with Brushes:
Use stiff-bristled brushes to scrub surfaces (e.g., tiles, grout) where mold growth is visible. - b) HEPA Vacuuming:
High-Efficiency Particulate Air (HEPA) vacuums are effective in removing loose mold fragments from surfaces without redistributing spores into the air. - c) Sanding or Abrasion Cleaning:
For porous materials like wood affected by surface-level molds, sanding can remove contaminated layers effectively.
| Method | Best Used On | Equipment Needed | Safety Precautions |
| Scrubbing | Tiles, countertops | Stiff brush + detergent | Wear gloves + mask |
| HEPA Vacuuming | Non-porous floors/walls | HEPA vacuum cleaner | Full PPE |
| Sanding/Abrasion Cleaning | Wood beams/furniture | Sandpaper/grinder | Goggles + respirator |
4. Chemical Treatments for Mold Elimination
- Bleach Solutions (10%): Effective on nonporous materials such as bathroom tiles but may not penetrate porous items like drywall or insulation.
- Hydrogen Peroxide (3%): Less toxic than bleach; suitable for cleaning fabrics and porous materials.
- Antimicrobial Sprays: Commercial products designed specifically to kill fungi while preventing regrowth.
- White Vinegar: A natural alternative that is safe but slower acting on tough infestations.
When using any chemical solution: 1. Always follow manufacturer instructions carefully. 2. Ventilate workspaces adequately during application. 3. Wear appropriate personal protective equipment (PPE), including gloves, goggles, and masks.
5. Replace Unsalvageable Materials
- Cut away affected areas of drywall at least 12 inches beyond any visible growth.
- Dispose of contaminated items in sealed plastic bags according to local regulations.
6. Monitor and Prevent Recurrence
- Reduce indoor humidity levels below 50% using dehumidifiers or air conditioners.
- Regularly inspect areas prone to moisture buildup (e.g., bathrooms).
- Fix leaks promptly in plumbing or roofing structures.
- Ensure proper ventilation in high-moisture zones like kitchens and laundry rooms.
By following these steps systematically alongside preventive measures post-remediation efforts will yield long-term benefits against future outbreaks of harmful molds within indoor spaces.
Complete Guide to Mold Removal Florida: Air Treatment and Remediation
Proper air treatment plays a critical role in mold remediation. By addressing airborne mold spores, you can reduce the risk of recontamination and create a healthier indoor environment. This guide discusses effective methods and tools for treating air during mold removal, helping to ensure thorough remediation.
Effective Air Treatment for Mold Removal Services Florida
- Resettle on cleaned surfaces.
- Contaminate unaffected areas.
- Pose health risks by causing respiratory issues or allergic reactions.
By incorporating air treatment into your mold removal strategy, you improve overall effectiveness while protecting occupants from harm.
Effective Air Treatment Solutions by a Leading Mold Removal Company Florida
1. HEPA Filtration
Using HEPA (High-Efficiency Particulate Air) filters is one of the most effective ways to capture airborne mold spores. These filters trap particles as small as 0.3 microns, making them highly efficient at improving indoor air quality.
Advantages of HEPA filtration: – Removes up to 99.97% of airborne contaminants. – Reduces the spread of mold spores during cleaning. – Provides cleaner airflow in affected spaces.
HEPA filters are commonly found in devices like air scrubbers and vacuum cleaners used for professional remediation projects.
2. Negative Air Pressure Systems
Creating negative pressure helps prevent cross-contamination by containing airborne particles within the affected area.
Key features: – A sealed containment area is established using plastic sheeting and tape. – An exhaust system vents contaminated air outside the building. – The negative pressure draws clean outside air into the space while pushing contaminated air out.
This method ensures that mold spores don’t spread beyond the treated location.
3. Air Scrubbers
Air scrubbers equipped with HEPA filters actively cleanse the air in an enclosed space by pulling in contaminated particles and releasing filtered, clean air back into the room.
Benefits of using an air scrubber: – Continuous removal of airborne contaminants during cleanup. – Improvement in overall indoor air quality following remediation.
Example Table: Comparison Between HEPA Filters and Air Scrubbers
| Feature | HEPA Filters | Air Scrubbers |
| Primary Function | Capture airborne particulates | Actively filter and recirculate air |
| Standalone Unit Needed | No | Yes |
| Ideal For | Vacuum cleaners, HVAC systems | Enclosed spaces |
4. Dehumidifiers
Since mold thrives in moist environments, reducing humidity levels is crucial to inhibiting its growth post-remediation.
Tips for dehumidifier use: – Maintain relative humidity below 50%. – Use high-capacity units for large spaces or areas with significant moisture issues.
Effective Water Damage Restoration Florida: Best Practices for Air Treatment
- Isolate affected areas using containment barriers before beginning work.
- Monitor humidity levels throughout the process with a hygrometer.
- Regularly inspect and clean equipment such as HEPA filters and dehumidifiers to maintain efficiency.
- Dispose of captured materials properly after completing cleanup tasks.
By implementing these techniques, you’ll not only eliminate existing contamination but also help prevent future recurrence through improved indoor environmental conditions.

Thorough Mold Inspection Florida: Ensuring Cleaner Airflow Through Ductwork
Mold in ductwork not only compromises the quality of air circulating in your home or workplace but can also pose serious health risks. Addressing mold in HVAC systems requires a detailed and methodical approach to ensure that spores are eliminated and do not spread further. Below, we outline effective techniques and considerations for removing mold from ductwork.
Signs of Mold in Ductwork
- Musty or damp odors emanating from vents.
- Visible black, green, or white growth inside ducts.
- Increased allergy-like symptoms such as sneezing, coughing, or wheezing among occupants.
- Excessive humidity levels in the building.
If any of these indicators are present, it’s time to inspect and clean the system thoroughly.
Step-by-Step Process for Mold Removal from Ducts
- Inspection and Preparation
Begin by inspecting the entire HVAC system for signs of mold growth. Use tools like flashlights and cameras with flexible attachments to access hard-to-reach areas. Once identified: - Wear protective gear such as gloves, goggles, and respirators.
- Turn off the HVAC system to prevent spore dispersal during cleaning.
- Vacuuming with HEPA Filters
Use a vacuum equipped with a HEPA filter to remove loose debris and mold particles from ducts. A HEPA filter ensures that microscopic spores are trapped rather than redistributed into the air. - Cleaning with Antimicrobial Solutions
After vacuuming: - Apply an EPA-approved antimicrobial cleanser directly onto affected areas.
- Scrub the interior surfaces using a non-abrasive brush or cloth.
- Focus on corners and crevices where mold may accumulate.
- Fogging for Deep Penetration
Fogging involves dispersing a fine mist of antifungal solution throughout the duct system: - This method is particularly effective at reaching deeper sections where manual scrubbing may be difficult.
- Ensure proper ventilation during this process.
- Drying the System Completely
Moisture is one of the primary triggers for mold growth; therefore, it is critical to completely dry all components after cleaning: - Use dehumidifiers or fans if necessary.
- Consider applying preventive coatings that inhibit future moisture retention.
Tools and Materials Required
| Tool/Material | Purpose |
| Protective gear | Ensures safety during cleaning |
| HEPA-filtered vacuum | Removes loose debris without spreading spores |
| Antimicrobial cleansers | Kills existing mold colonies |
| Non-abrasive brushes/cloths | For manual scrubbing |
| Fogging equipment | Disperses antifungal solution effectively |
Preventative Measures for Maintaining Clean Airflow
- Control Humidity Levels: Maintain indoor humidity between 30%–50% using dehumidifiers if needed.
- Regular Inspections: Schedule routine checks for early detection of moisture issues or microbial growth.
- Replace Filters Frequently: Ensure your HVAC filters are replaced every 1–3 months based on manufacturer recommendations.
- Seal Leaks: Repair leaks in ducts that could allow water intrusion leading to conducive conditions for mold development.
By following these steps diligently, you can restore cleaner airflow through your duct system while minimizing health risks associated with airborne contaminants. Keeping ducts free of moisture and debris will also contribute to improved energy efficiency within your HVAC unit over time.
Effective Mold Removal from Ductwork to Ensure Cleaner Airflow
Removing mold from ductwork is a critical step in improving indoor air quality. Mold growth within HVAC systems can lead to the circulation of harmful spores throughout your home or office, posing risks to both health and property. Below, we outline effective steps and strategies for safely and comprehensively eliminating mold from ductwork.
Why Mold in Ductwork Is a Concern
- Poor indoor air quality.
- Respiratory issues for occupants.
- Lingering musty odors.
- Reduced HVAC system efficiency.
Taking decisive action is essential once mold is detected in your ductwork.
Tools and Equipment Needed
- Protective gear: Gloves, safety goggles, N95 mask or respirator.
- Antimicrobial cleaners: Formulated products designed specifically for mold remediation.
- Vacuum with HEPA filter: To safely capture mold spores without reintroducing them into the air.
- Soft-bristle brushes: For loosening visible mold colonies.
- Duct insulation replacement materials (if necessary).
Step-by-Step Guide to Removing Mold from Ductwork
- Turn Off HVAC System
Before beginning any cleaning process, switch off the HVAC system to avoid circulating spores during the work. - Inspect and Identify Affected Areas
Open access panels or vents to inspect the interior of the ducts for visible signs of mold growth such as black or green patches. - Vacuum Using a HEPA Filter Vacuum
Use a vacuum equipped with a HEPA filter to remove loose debris, dust, and surface-level mold fragments from inside the ductwork. - Apply an Antimicrobial Cleaner
Using an antimicrobial solution designed for HVAC use: - Spray directly onto affected areas inside the ducts.
- Allow it to sit for the recommended dwell time on product instructions.
- Scrub with soft-bristle brushes if needed.
- Clean Vent Covers and Grilles Separately
Remove vent covers/grilles and clean them thoroughly with soap and water followed by an antimicrobial spray before reinstalling them. - Dry Thoroughly
Use fans or dehumidifiers near duct openings if possible to completely dry out the cleaned areas since lingering moisture encourages regrowth. - Replace Damaged Insulation If Necessary
If your duct insulation has been compromised by extensive mold infestation:- Remove old material carefully while wearing protective gear.
- Replace it with new insulation materials suitable for your HVAC system.
Preventing Future Mold Growth in Ducts
| Preventative Action | Benefits |
| Regularly change HVAC filters | Reduces dust buildup that traps moisture |
| Schedule professional maintenance checks | Identifies issues before they escalate |
| Address leaks promptly | Eliminates sources of excess moisture |
| Control humidity levels indoors | Keeps humidity below 60% |
Implementing these steps helps ensure cleaner airflow through your living or working space long-term.
Proactively addressing issues within your HVAC system minimizes health risks while maintaining optimal system performance over time.
How Scrubbing with Antimicrobial Cleanser Helps Eradicate Mold
Eradicating mold effectively requires a combination of proper techniques, tools, and cleaning agents. One highly effective method is scrubbing surfaces with an antimicrobial cleanser. This process not only removes visible mold but also prevents regrowth by targeting the microscopic spores that are often left behind. Below, we’ll explore why antimicrobial cleansers are essential for mold remediation, the steps to use them properly, and best practices for optimal results.
What Are Antimicrobial Cleansers?
Antimicrobial cleansers are specialized cleaning solutions designed to kill or inhibit the growth of microorganisms such as bacteria, fungi (including mold), and viruses. Unlike regular household cleaners, these solutions contain active ingredients that specifically target and neutralize harmful pathogens at the molecular level. This makes them particularly effective in environments prone to mold growth.
- Quaternary ammonium compounds: Effective against a broad range of microorganisms.
- Chlorine-based agents: Useful for tough stains and eliminating biofilms.
- Hydrogen peroxide: Eco-friendly and efficient in breaking down mold spores.
- Phenolic disinfectants: Often used in medical settings for their potency.
Benefits of Using Antimicrobial Cleansers on Mold
- Complete Spore Removal
While traditional cleaners may remove visible mold colonies, they often leave behind microscopic spores. Antimicrobial cleansers penetrate porous surfaces where spores tend to hide, ensuring thorough eradication. - Prevention of Regrowth
Mold thrives in damp, nutrient-rich environments. By applying an antimicrobial solution, you create a protective barrier that inhibits regrowth even if moisture levels rise again. - Improved Air Quality
Since mold releases airborne spores that can trigger allergies or respiratory issues, thorough scrubbing minimizes the risk of airborne contamination. - Versatility Across Surfaces
These cleansers are suitable for a variety of surfaces such as drywall, wood framing, concrete floors, tiles, and more.
Steps to Safely Scrub Mold with an Antimicrobial Cleanser
- Wear personal protective equipment (PPE) like gloves, goggles, and an N95 respirator mask.
- Seal off nearby areas using plastic sheeting to prevent cross-contamination.
- Ensure proper ventilation by opening windows or using exhaust fans.
- Use a vacuum cleaner equipped with a HEPA filter to remove dust and loose debris from the affected area before applying any cleanser.
- Read product instructions carefully to understand proper dilution ratios if required.
- Spray or pour the solution onto the surface generously but without oversaturating it.
- Use a stiff nylon brush or sponge to scrub away both visible mold colonies and stains.
- Focus on crevices and textured surfaces where spores may hide.
- Depending on the product’s guidelines, rinse off any residue with clean water or wipe it away with a damp cloth.
- Use fans or dehumidifiers to dry all cleaned surfaces as quickly as possible since moisture is a key factor in recurring mold problems.
| Step | Action | Tools Needed |
| Prepare | Protect yourself & isolate workspace | PPE (gloves/mask), plastic sheet |
| Pre-Clean | Remove dust/debris | HEPA vacuum |
| Apply Cleaner | Spray/dab antimicrobial solution | Spray bottle/cloth |
| Scrub | Remove molds from surface | Nylon brush/sponge |
| Rinse & Dry | Wipe/rinse & dry thoroughly | Damp cloth/fans |
Tips for Best Results
- Always test an antimicrobial cleanser on an inconspicuous area before full application to ensure compatibility with your surface material.
- Avoid using abrasive brushes on delicate materials like painted walls or fabric upholstery.
- For extensive infestations spanning large areas or porous materials like drywall or carpet padding beyond repairable conditions, consult professional remediation services rather than attempting DIY solutions.
Scrubbing with antimicrobial cleansers is critical in ensuring long-lasting results during mold remediation efforts—a step homeowners should not overlook when tackling this persistent issue effectively while promoting healthier indoor spaces overall without cutting corners.
- Mold Removal Services Florida: Causes, Risks, and Prevention Strategies for Homes
- Comprehensive Guide to Mold Remediation Florida: Process and Benefits
- Effective Mold Remediation Florida Techniques for Completely Eliminating Mold
- Mold Remediation Florida: Protecting Your Health and Well-Being
- The Top 8 Questions to Ask Before Hiring a Mold Removal Florida Expert
- Comprehensive Guide to Mold Remediation Florida Homeowners Can Trust
- 6 Essential Steps to Expect During Mold Removal Services Florida
- Effective Mold Remediation Florida: Solutions for a Healthier Home
- Mold Remediation Florida: Effective Strategies for Eliminating Mold in Your Home
Mold Remediation Florida: Protecting Your Health and Well-Being

Mould is a common issue in many households, but its presence goes beyond being a simple annoyance. It significantly impacts health and well-being, especially for individuals with respiratory issues or compromised immune systems. Understanding the effects of mould can help you take proactive steps toward creating a healthier living environment.
What is Mould?
Mould refers to fungi that grow in damp, warm, and humid conditions. These microscopic organisms reproduce through tiny spores that float through the air. When these spores land on moist surfaces, they begin to grow and spread. Common household mould types include:
– Cladosporium: Often found on fabrics and wooden surfaces.
– Aspergillus: Found in dust and building materials like drywall.
– Stachybotrys (Black Mould): Grows on moist materials such as paper or wood.
How Does Mould Impact Health?
When mould grows indoors, it releases spores into the air that can be inhaled or come into contact with the skin. This exposure can lead to various health problems depending on the individual’s sensitivity level.
Common Health Symptoms Associated with Mould Exposure:
- Chronic coughing or wheezing.
- Difficulty breathing.
- Nasal congestion or sinus infections.
- Sneezing.
- Red, itchy eyes.
- Skin rashes.
- Asthma attacks for individuals with pre-existing conditions.
- Increased risk of lung infections in people with weakened immune systems.
Mental Health Effects of Living with Mould
The presence of mould may also contribute to emotional stress and mental health challenges due to living in an unhealthy environment. Studies suggest prolonged exposure to dampness and indoor mould has been linked to anxiety, fatigue, and difficulty concentrating.
Who is Most at Risk?
While anyone can be affected by mould exposure, certain groups are particularly vulnerable:
– Infants and young children. – Elderly individuals. – People with asthma or allergies. – Those with compromised immune systems (e.g., cancer patients undergoing chemotherapy).
| Vulnerable Group | Potential Risks | Recommended Action |
| Infants/Children | Respiratory illnesses | Ensure regular ventilation; use dehumidifiers |
| Asthmatics/Allergic People | Triggered asthma attacks; allergies | Reduce exposure; wear masks during cleaning |
| Immune-compromised Persons | Infections from toxic mould | Professional remediation services advised |
Why You Should Address Mould Promptly
Ignoring mould problems will not only compromise your health but also damage your home structurally over time by weakening walls or ceilings where it thrives. Addressing this issue early can prevent long-term risks while fostering a safer environment for you and your family.
By understanding how deeply mould affects physical and mental health as well as its broader impacts on well-being, you’ll be better equipped to create an action plan to mitigate its growth effectively within your home or workspace.
Essential Risks to Know About Mold Removal Florida and Your Health
Mould is more than just an unpleasant sight or smell in your home; it can have serious implications for your health and well-being. Understanding the risks associated with mould exposure is essential to safeguarding yourself and your loved ones. Below, we explore how mould affects health, highlighting both short- and long-term issues.
Effective Mold Removal Services Florida: Protect Yourself from Immediate Health Effects
- Respiratory Irritation: Exposure to mould spores can irritate the nose, throat, sinuses, and lungs.
- Allergic Reactions: Many people experience symptoms such as sneezing, runny nose, red eyes, or skin rashes.
- Asthma Flare-Ups: Mould exposure can trigger asthma attacks in individuals with pre-existing asthma.
Those with pre-existing respiratory conditions or compromised immune systems may be more vulnerable to severe reactions.
Understanding the Importance of a Mold Removal Company Florida Residents Trust
- Long-term contact with mould may lead to chronic bronchitis or worsen conditions like Chronic Obstructive Pulmonary Disease (COPD).
- For those already immunocompromised (e.g., cancer patients undergoing treatment), prolonged exposure could exacerbate their condition.
- Certain types of moulds produce toxins called mycotoxins that have been linked to infections in sensitive individuals.
- Studies suggest a link between living in damp environments with visible mould and increased rates of stress or depressive symptoms.
| Health Risk | Symptoms or Impact |
| Respiratory Irritation | Sneezing, coughing, nasal congestion |
| Allergic Reactions | Skin rash, itchy eyes |
| Asthma Aggravation | Shortness of breath |
| Chronic Lung Issues | Persistent coughs; potential lung infections |
| Neurological Symptoms | Fatigue; difficulty concentrating (in rare cases) |
Populations at Greater Risk from Water Damage Restoration Florida
- Children & Infants: Developing immune systems are less capable of combating allergens.
- Elderly Individuals: Age-related declines in immunity increase susceptibility.
- Individuals with Allergies/Asthma: Pre-existing sensitivities heighten adverse reactions.
- Immunocompromised Individuals: Cancer patients or those on immunosuppressant medication are particularly at risk for fungal infections.
Comprehensive Mold Inspection Florida: Protect Your Health
- Address moisture problems promptly – fix leaks or improve ventilation.
- Clean up small areas of visible mould safely using detergent and water (while wearing protective gear).
- Consult professionals for large-scale infestations for safe remediation practices.
- Test humidity levels indoors regularly (keep levels below 50%).
Understanding how mould affects your health allows you to take proactive measures toward prevention and maintaining a healthy environment at home.

The Causes of Mould Growth Indoors and How to Address Them
Mould growth indoors is a common issue that, if left untreated, can lead to structural damage and health concerns. Understanding the reasons behind mould formation and taking prompt actions is essential for maintaining a safe living environment. Below, we discuss the primary causes of indoor mould growth and practical ways to address them.
Common Causes of Mould Growth Indoors
- Leaking pipes or roofs can introduce constant sources of moisture.
- Poor ventilation in areas like bathrooms and kitchens traps humid air.
- Flooding or water damage provides an ideal breeding ground for mould.
- Humid climates or poorly air-conditioned homes often create high humidity levels indoors.
- When indoor humidity exceeds 60%, it encourages mould spores to thrive on surfaces like walls, ceilings, and furniture.
- Condensation forms when warm air comes into contact with cooler surfaces, such as single-pane windows or poorly insulated walls.
- Over time, this moisture buildup serves as a feeding ground for mould.
- Mould grows particularly well on porous materials such as wood, drywall, carpets, and fabrics.
- Dust and dirt accumulation on these surfaces provide additional nutrients for mould growth.
- Ignoring small leaks or failing to clean damp areas can allow mould colonies to spread unchecked.
- Blocked gutters or drains may also contribute by causing water seepage into walls or basements.
1. Control Moisture Levels
- Fix leaks promptly in plumbing systems, roofs, or gutters.
- Use dehumidifiers in areas prone to high humidity (e.g., basements).
- Ensure proper drainage around your home’s foundation to prevent water pooling near walls.
2. Improve Ventilation
- Install exhaust fans in high-moisture rooms like bathrooms and kitchens.
- Regularly open windows when weather permits to allow fresh air circulation.
- Use ceiling fans where applicable to distribute air evenly throughout your space.
3. Prevent Condensation Buildup
| Area Affected | Solution |
| Windows | Install double-glazed or insulated windows. |
| Walls | Add insulation during renovations. |
| Unused Areas | Keep doors slightly open for airflow. |
4. Regular Maintenance Practices
- Clean gutters regularly to prevent water overflow near your home’s foundation.
- Inspect HVAC systems for potential mold-related issues such as clogged filters.
- Dry wet areas immediately after spills or floods using fans or heaters.
Identifying Problem Areas Early
- Look out for visible discoloration (greenish-black spots) on walls and ceilings.
- Notice musty odors indicating hidden mould colonies.
By addressing these root causes proactively, you can create an environment less hospitable for indoor mould growth while ensuring a healthier home overall.
The Causes of Mould Growth Indoors and How to Address Them
Mould growth indoors is a common issue that can lead to health problems, property damage, and diminished air quality. Understanding why mould develops and how to address the root causes is essential for maintaining a safe and healthy environment. Below, we will discuss the primary causes of indoor mould growth and practical ways to tackle these issues.
Common Causes of Mould Growth Indoors
- Excess Moisture
Moisture is one of the most significant contributors to mould growth. This can result from a variety of sources, including: - Leaking pipes or roofs
- Flooding or water damage
- Poorly sealed windows or doors
- Condensation due to temperature differences
- High indoor humidity levels (above 60%)
- Poor Ventilation
Insufficient airflow prevents moisture from evaporating effectively, creating an ideal environment for mould. Areas like bathrooms, basements, kitchens, and laundry rooms are particularly vulnerable. - Organic Materials
Mould thrives on organic materials such as wood, drywall, carpet, paper products, or fabrics. When combined with moisture and warmth, these materials can quickly become breeding grounds for mould. - Temperature Conditions
Mould tends to grow in warm and humid conditions (typically between 77°F-86°F or 25°C-30°C). However, some types can survive in cooler temperatures if other factors like moisture are present. - Neglected Maintenance
Failing to address minor leaks or clean damp areas promptly allows mould spores to spread undetected over time.
Steps to Address Mould Growth Causes
- Use dehumidifiers in areas with high humidity levels.
- Fix plumbing leaks immediately.
- Inspect roofs regularly for damage or leaks.
- Install proper drainage systems around your home’s foundation.
- Ensure exhaust fans are installed and functioning properly in bathrooms and kitchens.
- Open windows regularly when weather permits.
- Use air purifiers equipped with HEPA filters to enhance air quality.
- Opt for synthetic materials where possible in high-moisture areas like bathrooms.
- Keep carpets dry by cleaning up spills immediately.
- Store paper goods (e.g., books) in dry conditions away from humidity sources.
- Monitor Indoor Temperature A consistent temperature between 68°F-72°F (20°C-22°C) with low humidity helps create an environment less conducive to mould growth.
- Conduct Routine Inspections Regularly inspect areas prone to excess moisture: | Location | What To Look For | |————————|——————————————-| | Bathrooms | Leaks under sinks/showers; grout mildew | | Kitchens | Plumbing under sinks/appliances | | Basements | Wall discoloration; damp floors | | Windowsills | Signs of condensation; peeling paint |
- Address Foundational Issues Ensure that your home’s foundation is free of cracks that allow water seepage during heavy rains.
By identifying the root causes of indoor mould growth and implementing effective preventative measures, you will not only protect your property but also safeguard your health from potential risks associated with prolonged exposure to mould spores.

Effective Actions You Can Take to Remove Mould from Your Home
When mould starts growing in your home, addressing it promptly is critical to ensuring a safe living environment. Mould can harm both your health and property if left untreated. Below are some effective actions and strategies to remove mould safely and efficiently.
1. Identify the Source of Moisture
- Leaking pipes or faucets
- Poor ventilation in bathrooms, kitchens, or basements
- Roof leaks or damaged gutters
- Condensation buildup on windows or walls
Repairing these issues helps prevent further mould growth even after removal.
2. Gather Essential Tools and Materials
- Protective gear: gloves, goggles, and an N95 respirator mask
- Scrubbing brushes with stiff bristles
- Cleaning solutions (e.g., diluted bleach or commercial anti-mould products)
- Disposable rags or sponges
- Plastic sheeting (for containment)
- HEPA vacuum cleaners (for spores)
3. Use Safe Cleaning Methods for Small Areas
- Ventilate the room: Open windows or use fans to reduce airborne spores during cleaning.
- Contain the area: Cover nearby furniture or unaffected areas with plastic sheeting to limit spore spread.
- Apply cleaning agents: Use a solution of one cup of bleach mixed with one gallon of water, or a store-bought antimicrobial cleaner specifically designed for mould removal.
- Scrub thoroughly: Remove visible mould by scrubbing hard surfaces like tiles and glass until all traces are gone.
- Dispose of contaminated materials carefully: Place used rags, brushes, and other disposable items in sealed bags before discarding them.
Note: Avoid mixing bleach with ammonia-based cleaners as this creates toxic fumes.
4. Address Porous Materials
| Material | Recommended Action |
| Carpeting | Replace if heavily infested |
| Drywall | Cut out affected sections completely |
| Upholstery | Steam-clean if minor; discard if severe |
Doing so ensures that the infestation does not return.
5. Consider Professional Remediation for Larger Issues
- Possess specialized equipment for removal and containment
- Conduct thorough testing to ensure complete eradication
- Follow industry standards such as those outlined by organizations like IICRC (Institute of Inspection Cleaning and Restoration Certification)
6. Prevent Future Mould Growth
- Install dehumidifiers in damp areas to maintain indoor humidity levels below 50%
- Improve household ventilation by using exhaust fans during cooking/showering
- Fix leaks promptly when detected
- Regularly inspect potential problem areas such as attics, basements, or crawl spaces
By implementing these measures consistently, you can maintain a clean and healthy living environment while reducing the risk of future outbreaks substantially.
Testing for Mould in Your Home: When and Why It’s Necessary
Mould can be a persistent and hidden problem in many homes, often lurking unnoticed until it becomes a serious issue. Testing for mould is an essential step to ensure your home is safe and healthy, especially if you suspect its presence or experience symptoms associated with mould exposure. Here’s everything you need to know about when and why testing for mould is necessary.
When Should You Test for Mould?
- Visible Signs of Mould Growth: If you notice discolored spots, patches of black, gray, green, or white on walls, ceilings, or other surfaces, it’s time to test for mould.
- Unexplained Health Symptoms: Persistent allergies, respiratory issues, skin irritation, or headaches could indicate mould exposure in your home.
- Musty Odors: A distinct musty smell often signals hidden mould growth that needs investigation.
- Water Damage History: Areas affected by leaks or floods are at high risk of harbouring mould. Testing can confirm whether remediation efforts have been effective.
- Buying or Selling a Home: Conducting a mould test during real estate transactions can ensure there are no underlying issues affecting property value and safety.
Why Is Mould Testing Important?
Testing for mould provides critical information about the type of infestation present as well as its severity. Understanding these details helps guide the appropriate course of action while protecting the health of those living in the space.
- Often, mould grows behind walls, under flooring, or in other concealed areas.
- Testing ensures that even non-visible infestations are addressed promptly.
- Some types of mould (e.g., Stachybotrys chartarum—commonly known as black mold) can pose severe health risks.
- Knowing the species allows professionals to tailor their removal methods appropriately.
- Airborne spores are one way that mould spreads and affects indoor air quality.
- Tests like air sampling help measure contamination levels in your home’s environment.
- Post-remediation testing confirms whether all traces of mould have been removed after cleaning or professional intervention.
Types of Mould Tests
| Test Type | Description | Suitable For |
| Surface Sampling | Collects physical samples from visible spots using swabs or tape strips | Assessing specific areas with visible growth |
| Air Sampling | Measures spore concentrations in indoor air | Evaluating overall air quality |
| Bulk Testing | Analyzes materials taken from contaminated items (e.g., drywall) | Understanding localised damage |
| Culture-Based Testing | Grows collected samples in a lab to identify specific species | Determining detailed characteristics |
What Should You Do After Receiving Test Results?
- For low-risk findings: Address minor problems with proper cleaning techniques such as scrubbing hard surfaces with detergents and ensuring ventilation.
- For high-risk cases: Contact experienced remediation specialists who can safely remove large-scale infestations and repair structural damage caused by moisture intrusion.
Testing for mould is not just about identifying its presence but also about safeguarding your indoor environment from potential health hazards over time.
- Mold Removal Services Florida: Causes, Risks, and Prevention Strategies for Homes
- Comprehensive Guide to Mold Remediation Florida: Process and Benefits
- Effective Mold Remediation Florida Techniques for Completely Eliminating Mold
- Mold Remediation Florida: Protecting Your Health and Well-Being
- The Top 8 Questions to Ask Before Hiring a Mold Removal Florida Expert
- Comprehensive Guide to Mold Remediation Florida Homeowners Can Trust
- 6 Essential Steps to Expect During Mold Removal Services Florida
- Effective Mold Remediation Florida: Solutions for a Healthier Home
- Mold Remediation Florida: Effective Strategies for Eliminating Mold in Your Home
The Top 8 Questions to Ask Before Hiring a Mold Removal Florida Expert

When facing mold issues, hiring the right mold remediation company is critical for ensuring effective and safe treatment. Asking the right questions during this process will help you assess whether the company is qualified, experienced, and reliable. Below are eight key questions to guide your decision-making.
What to Ask a Mold Removal Company Florida: Are You Licensed, Certified, and Insured?
- Verify that the company holds necessary licenses and certifications specific to mold remediation.
- The Institute of Inspection, Cleaning and Restoration Certification (IICRC)
- National Organization of Remediators and Mold Inspectors (NORMI)
- Ensure the company carries proper liability insurance to protect against potential damages or complications.
How Much Experience Do You Have in Water Damage Restoration Florida?
- Choose a company with proven experience in handling various types of mold contamination.
- Request references or examples of past projects that are similar in scope to your situation.
- Ask how long they have been operating in this field.
Do You Offer a Detailed Mold Inspection Florida Report?
- The type(s) of mold identified
- The extent of contamination
- Underlying moisture issues contributing to the growth
- Confirm whether air quality testing or lab analysis will be conducted when necessary.
What Methods Do You Use for Mold Containment and Removal?
Understanding their approach helps you gauge their professionalism and adherence to best practices. A reputable mold remediation process typically includes: – Containing affected areas using barriers such as plastic sheeting or negative air pressure machines. – HEPA vacuuming contaminated surfaces. – Safe removal of damaged materials like drywall or carpets.
Ask if they follow Environmental Protection Agency (EPA) guidelines when performing work.
How Do You Ensure Cross-Contamination Is Prevented?
Preventing the spread of mold spores is essential during remediation: – Inquire whether they use negative air machines or other tools for containment. – Confirm that all tools and equipment used on-site are sanitized before being brought into unaffected areas.
Table: Key Tools for Preventing Cross-contamination
| Tool/Equipment | Purpose |
| Negative Air Machines | Creates negative pressure to contain spores |
| HEPA Filters | Traps fine particles, including mold spores |
| Plastic Sheeting | Creates physical barriers |
Are Your Technicians Trained in Safety Protocols?
Mold can pose health risks if not handled carefully: – Confirm that technicians use proper personal protective equipment (PPE), such as masks, gloves, goggles, and suits. – Ask about safety training certifications related to indoor air quality and hazardous material handling.
What Will Happen After Remediation is Complete?
Post-remediation steps are critical for ensuring long-term results: – Verify that they offer clearance testing after remediation is complete to confirm successful removal of contaminants. – Discuss recommendations for future prevention techniques, including moisture control strategies or improved ventilation.
Do You Offer Warranties on Your Services?
A trustworthy company should stand behind its work: – Ask about warranties provided on their services or guarantees regarding post-removal results.
For instance: * “Do you offer free follow-up inspections within a certain time frame if mold reappears?” * “What recourse do I have if remediation does not resolve the issue?”
Hiring a reputable mold remediation company requires careful consideration. By asking these eight questions upfront, you’ll ensure your home or property receives professional care while avoiding unnecessary risks during this complex process.
The Crucial Importance of Mold Remediation Florida Training and Certifications for Technicians
When hiring a mold remediation company, one of the most critical factors to evaluate is whether their technicians possess adequate training and certifications. Mold removal is a specialized field that requires knowledge, skills, and adherence to industry standards to ensure safety and effectiveness. Below are key reasons why proper training and certifications for mold removal professionals should never be overlooked.
Ensuring Health and Safety Standards
- Identify different types of mold, including toxic varieties such as black mold (Stachybotrys chartarum).
- Minimize the release of airborne spores that can exacerbate contamination.
- Safely use chemicals or cleaning agents during the remediation process.
Without appropriate training, there’s a higher likelihood of improper handling, which could lead to health hazards for everyone involved.
Knowledge of Industry Protocols
- Proper containment methods to prevent cross-contamination.
- Accurate moisture detection techniques.
- Step-by-step remediation processes tailored to various levels of infestation.
When hiring a company with certified technicians, you can rest assured that they’ll follow these best practices diligently.
Access to Advanced Tools and Techniques
| Tool/Equipment | Purpose |
| Moisture meters | Detecting hidden moisture in walls/floors |
| HEPA air scrubbers | Filtering airborne particles during cleanup |
| Infrared cameras | Pinpointing areas of moisture behind surfaces |
Technicians without formal training may lack the expertise needed to operate these tools effectively or interpret their results accurately.
Adherence to Local Regulations
Mold remediation often involves compliance with various local regulations regarding chemical use, waste disposal, and safety measures. Certified professionals are well-versed in these requirements and ensure every step aligns with legal standards. This reduces liability risks for property owners while guaranteeing environmentally responsible practices.
Benefits of Hiring Certified Technicians
- Efficient Results: Trained professionals complete the job right the first time, reducing future recurrence.
- Cost Savings: Avoid additional expenses caused by incomplete or substandard work.
- Peace of Mind: Knowing your home or business is free from mold-related hazards provides long-term reassurance.
Questions to Ask About Certifications
- Are your technicians certified by recognized organizations like IICRC or NORMI?
- What ongoing training do your employees receive?
- Can you provide documentation verifying certifications?
Asking these questions ensures transparency while helping you make an informed decision about who will handle your property’s mold issues effectively.
Effective Mold Removal Services Florida: Preventing Cross-Contamination During Remediation
When dealing with mold remediation, one of the critical components of the process is proper containment. Without containment, mold spores can easily spread to unaffected areas of your home or building, creating additional problems. Properly containing contaminated areas ensures a safer environment and more effective remediation.
Importance of Containment in Mold Remediation
- Increased health risks for occupants due to prolonged exposure.
- Additional costs from needing to remediate newly infected areas.
- Ineffectiveness of the initial mold removal efforts.
By isolating the contaminated areas, professionals can mitigate these risks and ensure a controlled environment for safe removal.
Key Steps in Establishing a Containment Zone
- Identify the extent and location of mold growth.
- Evaluate potential pathways for spore travel (e.g., doors, vents, air currents).
- Use plastic sheeting (typically 6-mil polyethylene) to seal off contaminated spaces.
- Secure barriers with tape or adhesive to prevent air leaks.
- Install HEPA-filtered negative air machines within the containment zone.
- Ensure consistent airflow that prevents spores from escaping outside the contained area.
- Close or cover vents and ducts leading out of the affected area.
- Prevent mold spores from entering heating or cooling systems where they could spread throughout the building.
- Establish a single access point into the contaminated zone using zippers on plastic sheeting or specially designed entry flaps.
- Limit access strictly to trained personnel wearing appropriate protective gear.
Tools and Materials Used for Containment
| Material/Tool | Purpose |
| Plastic Sheeting (6-mil) | Creates physical barriers around affected areas |
| HVAC Seals | Protects ventilation systems from contamination |
| HEPA Filters | Captures airborne particles during remediation |
| Negative Air Machines | Maintains pressure inside contained zones |
| Tape/Adhesives | Secures barriers effectively |
Benefits of Effective Containment
- Reduced risk of spore spread throughout adjacent spaces.
- Quicker restoration time since secondary contaminations are avoided.
- A safer workspace for technicians performing removal tasks.
Containment is not only an industry best practice but also a requirement stipulated by many professional guidelines such as those provided by the Institute of Inspection Cleaning and Restoration Certification (IICRC). Proper execution ensures that mold is eliminated at its source while protecting occupants’ health and property integrity.

How Containing Contaminated Areas Prevents Mold Cross-Contamination During Remediation
When dealing with mold remediation, one of the most critical elements of the process is containment. Without proper containment measures, mold spores can spread to unaffected areas, causing further contamination and increasing health risks. Below, we explore why containing contaminated areas is essential and how it prevents mold cross-contamination during remediation.
Why Containment Is Essential
- Wider spread of contamination: Uncontrolled mold spores can settle in new locations, requiring additional cleanup efforts.
- Increased health risks: Airborne mold particles exacerbate respiratory issues for occupants, especially those with allergies or asthma.
- Prolonged remediation timelines: Cross-contamination may necessitate repeat visits and additional work for professionals.
Essential Methods for Proper Containment
- Plastic sheeting (6-mil polyethylene or thicker) is often used to seal off affected spaces from the rest of the property.
- Doors and windows in the contaminated area are tightly sealed to limit airflow between rooms.
- HEPA-filtered negative air machines create a vacuum effect within the work area. These devices draw air into the contained space but prevent contaminated air from escaping.
- Technicians often set up “clean rooms” or “decontamination chambers” that serve as buffer zones between clean and contaminated spaces.
- Workers pass through these chambers when entering or leaving affected areas to minimize spore transfer.
- Vents and ductwork in contaminated zones are sealed off so that spores do not circulate through heating, ventilation, or air conditioning systems.
Tools Used in Containment
| Tool/Equipment | Purpose |
| Plastic Sheeting | Creates barriers around affected areas |
| HEPA Filters | Captures airborne contaminants |
| Negative Air Machines | Maintains negative pressure within containment |
| Adhesive Tapes | Secures plastic sheeting to walls and surfaces |
Benefits of Proper Containment Procedures
- Improved safety standards: Preventing airborne spore dispersion protects both workers and building occupants from exposure.
- Reduced costs over time: Limiting contamination means fewer repairs and shorter project durations.
- Enhanced reputation for professionals: Adhering to strict protocols demonstrates expertise and builds client trust.
By prioritizing proper containment practices, mold remediation technicians ensure that their efforts are thorough while safeguarding other parts of a property from unnecessary exposure. These measures ultimately save time, resources, and reduce potential damages caused by improper handling of mold contamination scenarios.
A Step-by-Step Overview of the Process for Effective Mold Contamination Treatment
When addressing mold contamination, following a structured and detailed process is essential to ensure the issue is resolved safely and effectively. Below is a step-by-step guide to help understand the key stages involved in professional mold remediation.
Step 1: Initial Inspection and Assessment
- Visual Examination: Professionals inspect visible areas of concern, such as damp walls, ceilings, or floors.
- Moisture Mapping: Using specialized tools like moisture meters to identify hidden pockets of moisture.
- Air Sampling: Testing air quality to determine the extent of airborne mold spores.
This assessment helps outline the scope of work needed for effective remediation.
Step 2: Identifying and Addressing the Moisture Source
- Plumbing leaks or pipe bursts
- Roof leaks or poor drainage systems
- Inadequate ventilation leading to condensation buildup
Professionals often collaborate with contractors or plumbers to resolve these issues before proceeding further.
Step 3: Isolation and Containment
- Sealing off areas with plastic sheeting and tape.
- Installing negative air pressure machines equipped with HEPA filters.
- Limiting access to contaminated spaces until remediation is complete.
Proper containment ensures that mold spores do not spread to unaffected parts of the property.
Step 4: Removal of Contaminated Materials
| Material | Decision Process | Disposal Method |
| Drywall | Assess structural integrity | Bagged & disposed as per local regulations |
| Insulation | Non-recoverable due to porosity | HEPA vacuumed and bagged |
| Wooden Surfaces | Can sometimes be cleaned if structurally sound | Sanded and treated |
Materials that can be salvaged are thoroughly cleaned and treated with antimicrobial solutions.
Step 5: Cleaning and Decontamination
- Vacuuming with HEPA filters to remove loose spores.
- Wiping down surfaces with antimicrobial cleaners.
- Treating hard-to-reach areas such as HVAC systems or crawlspaces where spores may linger.
This step ensures comprehensive decontamination across all impacted zones.
Step 6: Drying the Area Completely
- Lower humidity levels rapidly
- Prevent new microbial growth
- Stabilize indoor environmental conditions
Monitoring devices may also be placed around drying zones for accurate tracking over time.
Step 7: Post-Treatment Verification
- Air quality testing is conducted again.
- Surface samples are taken from treated areas for lab analysis.
- A detailed report documenting findings is provided by professionals.
Verification ensures that the property is safe before being returned to normal use.
Understanding this structured process highlights why professional mold contamination treatment goes beyond basic cleaning methods—ensuring both safety and long-term results when handled correctly.
Why Protective Gear is Essential for Safe and Effective Mold Removal
When addressing mold contamination, safety is paramount. Mold spores are microscopic and can easily become airborne during remediation, posing health risks to both technicians and occupants of the property. Proper protective gear plays a critical role in safeguarding individuals involved in the mold removal process while ensuring that the work is carried out effectively. Below, we will explore the importance of protective gear, what it includes, and how it helps mitigate risks during mold remediation.
The Health Risks of Mold Exposure
- Respiratory issues such as coughing or difficulty breathing
- Skin irritation or rashes
- Eye irritation (itchiness or redness)
- Nasal congestion or sinus infections
- Headaches and fatigue
Prolonged exposure to mold spores may lead to more severe conditions, including chronic respiratory illnesses. Therefore, proper mitigation strategies—such as the use of personal protective equipment (PPE)—are necessary to minimize these risks.
Essential Protective Gear for Mold Removal
- Respirators: Mold spores and dust particles can become airborne easily during cleanup activities. A respirator with an N95 rating (or higher) filters out harmful particles from the air and prevents them from being inhaled. Full-face respirators also protect the eyes from irritation caused by spores or cleaning agents.
- Gloves: Non-porous gloves made from materials such as nitrile or neoprene prevent direct skin contact with mold-contaminated surfaces and cleaning chemicals that might be harsh on the skin.
- Protective Clothing: Disposable coveralls create a barrier between workers’ clothing/skin and contaminated surfaces. These suits also minimize the risk of cross-contaminating other areas when exiting affected zones.
- Eye Protection: Goggles without ventilation vents ensure that no airborne spores come into contact with workers’ eyes during remediation tasks like scrubbing walls or removing damaged materials.
- Boot Covers: Disposable shoe covers help maintain cleanliness within unaffected areas of a building by preventing cross-contamination via footwear.
| Item | Purpose | Material Example |
| Respirator | Filters airborne particles | N95 mask; Full-face respirator |
| Gloves | Protects hands from chemicals/spores | Nitrile; Neoprene |
| Coveralls | Shields clothing | Polypropylene |
| Eye Protection | Prevents eye irritation | Non-vented goggles |
| Boot Covers | Avoids cross-contamination | Polyethylene |
Key Benefits of Using Protective Gear
- Health Protection: PPE creates physical barriers against allergens, toxins, and irritants released during remediation.
- Enhanced Work Efficiency: When technicians feel physically secure in their gear, they are able to focus better on completing tasks thoroughly.
- Legal Compliance: Adhering to Occupational Safety and Health Administration (OSHA) guidelines ensures that employers remain compliant with workplace safety standards.
- Reduced Liability Risks: By equipping workers appropriately, companies demonstrate due diligence toward worker safety—reducing potential legal issues caused by inadequate measures.
Tips for Proper Use of Protective Gear
- Inspect all PPE before each use for tears or damage.
- Ensure respirators fit snugly without gaps around edges.
- Discard single-use items like gloves and boot covers after exiting contaminated zones.
- Clean reusable equipment thoroughly following each project.
By following these best practices alongside wearing appropriate protective gear during mold remediation projects, professionals can ensure both safety standards are upheld and effective results are delivered consistently throughout every job site.

How Documentation Provides Transparency in Mold Remediation Services
Proper documentation is a critical aspect of professional mold remediation services. It ensures transparency, provides accountability, and offers clients a clear understanding of the processes involved. Whether you are a homeowner or business owner dealing with mold issues, comprehensive documentation can give you peace of mind that the job is being done correctly and thoroughly.
Why Documentation Matters in Mold Remediation
- Transparency: It ensures that clients understand each step of the remediation plan and how their concerns are being addressed.
- Accountability: Professional companies use documentation to demonstrate that they followed industry standards and best practices.
- Legal Protection: Thorough records can serve as evidence in cases where liability or compliance needs to be verified.
- Progress Tracking: Keeping track of changes helps measure success and identify any areas needing additional attention.
Types of Documentation Used
- Details about initial findings such as the location, type, and extent of mold growth.
- Information on factors contributing to moisture problems (e.g., leaks, humidity).
- A step-by-step outline of how the mold will be removed safely and effectively.
- Specifics on containment procedures, cleaning methods, and equipment used.
- Before-and-after images to visually showcase progress.
- Pictures of affected materials, areas treated, and final results.
- Results from air sampling conducted before and after remediation.
- Comparison data showing improvements in indoor air quality.
- Lists detailing contaminated materials disposed of during cleanup.
- Certifications confirming compliance with local regulations for hazardous waste disposal.
- A written statement outlining any post-remediation guarantees offered by the company.
Benefits for Customers
- Confidence in knowing that every stage is being handled properly.
- Clear communication about what was found, what was done to address it, and what steps were taken to prevent recurrence.
- Access to reports that can be shared with insurance companies or other stakeholders if needed.
| Document Type | Purpose |
| Inspection Report | Identifies extent of contamination; outlines contributing factors |
| Remediation Plan | Provides details on proposed treatment methods |
| Photo Documentation | Visual proof showcasing progress |
| Air Quality Reports | Verifies improvements after remediation |
| Disposal Records | Confirms safe handling/disposal of contaminated materials |
Choosing a Company That Values Documentation
- Do they provide written inspection reports?
- Will they share photos documenting their work?
- Are air quality tests included in their services?
- How do they ensure proper disposal processes?
A reliable company will not only have robust procedures for creating records but will also willingly share them with clients throughout the project. This commitment reflects professionalism and dedication to delivering high-quality service while fostering trust with their customers.
The Best Practices for Disposing of Materials After Completing Mold Remediation
Proper disposal of materials after mold remediation is a critical step in ensuring that the mold does not spread or pose ongoing health risks. Failing to handle contaminated materials appropriately can result in cross-contamination, environmental damage, and even legal liabilities. Below are the best practices for disposing of materials after completing a mold remediation project.
Separate Contaminated and Non-Contaminated Materials
When handling materials affected by mold, it’s important to separate items based on their level of contamination. This helps streamline disposal and protects non-contaminated items from accidental exposure.
Steps to follow:
– Inspect all materials thoroughly: Assess which items are salvageable and which need to be discarded. Porous materials such as drywall, insulation, carpet, or fabrics often retain mold spores and usually cannot be saved.
– Designate separate storage areas: Keep contaminated materials far from clean spaces or uncontaminated items during removal.
Use Appropriate Disposal Bags
Using proper containment bags is essential for safely disposing of mold-infested debris. This minimizes the risk of spores spreading while handling or transporting waste.
Best practices include:
– Use heavy-duty plastic bags that are at least 6 millimeters thick.
– Double-bag all waste: Place smaller bags inside larger ones for extra protection against tears or leaks during transport.
– Seal bags properly: Securely tie off each bag with duct tape or zip ties to ensure no openings are left exposed.
Label Waste Containers Clearly
Proper labeling is not only helpful but often mandatory if your local regulations classify certain types of mold-contaminated waste as hazardous material.
Include labels that state:
– “Mold Contaminated Material” or similar wording as required by local authorities. – Date of removal and contact details if necessary. – Warnings for workers handling the waste.
Dispose According to Local Regulations
Disposing of mold-contaminated material often falls under specific municipal, state, or country-wide regulations designed to protect public health and the environment. It’s vital to familiarize yourself with these rules before proceeding.
Key points to consider:
1. Contact your local Department of Environmental Protection (DEP) office or waste management agency for guidance on acceptable disposal facilities. 2. Determine whether certain wastes require special treatment (e.g., incineration). 3. Avoid illegal dumping practices—improper disposal could result in fines or other penalties.
| Waste Type | Disposal Method |
| Mold-infested drywall | Taken to landfill |
| Contaminated insulation | Bagged & landfilled |
| Porous furniture | Assessed & discarded |
| Plastic sheeting/containment | Recycled if cleanable |
Clean Tools and Equipment After Disposal
Once disposal is complete, it’s essential to clean any tools, equipment, or protective gear used during the remediation process thoroughly before they’re reused.
Cleaning Steps Include:
1. Wipe down hard surfaces with detergent solutions designed for microbial contaminants. 2. Wash protective clothing in hot water separately from other laundry. 3. Dispose of single-use PPE like gloves and masks in sealed containment bags marked as contaminated.
Monitor the Area Post-Cleanup
After disposing of contaminated materials, conduct air quality testing and visual inspections around previously treated areas to ensure no residual contamination remains visible.
By adhering strictly to these best practices for disposing materials post-remediation safely ensures both compliance regulation norms AND protects long-term home occupants’ health stability.
- Mold Removal Services Florida: Causes, Risks, and Prevention Strategies for Homes
- Comprehensive Guide to Mold Remediation Florida: Process and Benefits
- Effective Mold Remediation Florida Techniques for Completely Eliminating Mold
- Mold Remediation Florida: Protecting Your Health and Well-Being
- The Top 8 Questions to Ask Before Hiring a Mold Removal Florida Expert
- Comprehensive Guide to Mold Remediation Florida Homeowners Can Trust
- 6 Essential Steps to Expect During Mold Removal Services Florida
- Effective Mold Remediation Florida: Solutions for a Healthier Home
- Mold Remediation Florida: Effective Strategies for Eliminating Mold in Your Home
Comprehensive Guide to Mold Remediation Florida Homeowners Can Trust

Below is a professional step-by-step guide to what the remediation process entails, ensuring effectiveness and safety throughout.
Comprehensive Mold Removal Services Florida: Inspection and Assessment
The first step in mold remediation is identifying the extent of the problem.
- Damp or humid areassuch as basements, bathrooms, attics, and crawl spaces.
- HVAC systems, where condensation can lead to mold buildup.
- Walls, ceilings, or floorsthat show signs of water damage or discoloration.
Once the scope of contamination is determined, a detailed remediation plan is crafted.
Step 2: How a Mold Removal Company Florida Contains Affected Areas
- Polyethylene sheets to create barriers.
- Negative air machines equipped with HEPA filters to ensure mold spores don’t spread through ventilation systems.
Airborne mold spores can easily spread if not addressed.
| Material Type | Possible Actions |
| Drywall | Replace if heavily infested |
| Carpet | Remove if saturated |
| Insulation | Dispose when compromised |
| Wood surfaces | Sand/clean or replace |
- Vacuuming all surfaces with HEPA vacuums to capture loose spores.
- Washing walls, floors, ceilings, and any furniture with an appropriate cleaning agent.
- Applying fungicides or mildew-preventing treatments to discourage future growth.
Step 6: Drying and Dehumidification
Since moisture is one of the main contributors to mold growth, drying out affected areas is crucial after cleaning.
- Industrial dehumidifiers
- High-powered fans for air circulation
Ensuring that moisture levels drop within an acceptable range helps mitigate future risks.
Step 7: Restoration
The final step involves restoring your property back to its pre-mold condition.
- Replacing drywall
- Installing new carpet
- Painting walls
If structural damage occurred due to prolonged exposure, repairs may also extend to replacing wooden beams or reinforcing parts of your home’s foundation.
By following these carefully planned steps from inspection through restoration, mold remediation professionals ensure not only removal but also prevention against recurring issues.
Understanding the Difference Between Mold Removal and Mold Remediation
When tackling a mold issue in your home or workplace, it’s important to understand the distinction between mold removal and mold remediation. While both processes aim to address the presence of mold, their methods, objectives, and outcomes differ significantly. Knowing these differences can help you make informed decisions about how to handle mold problems effectively.
What is Mold Removal?
While this may provide an immediate improvement in appearance, it does not address the root cause of the problem or prevent future growth.
- Aesthetic focus: Primarily aimed at making surfaces look clean again.
- Limited scope: Addresses visible mold but may not remove microscopic spores or resolve moisture issues.
- Short-term results: Mold is likely to return if underlying causes are not addressed.
- Scrubbing with soap and water or specialized cleaning products.
- Using commercial-grade cleaners or bleach (though bleach is not always effective).
- Vacuuming with HEPA filters for surface-level spore removal.
What is Mold Remediation?
It involves identifying and addressing the root causes of contamination—such as moisture problems—and taking steps to prevent recurrence.
- Root cause focus: Addresses underlying issues like water damage, leaks, or humidity.
- Thorough approach: Removes both surface-level growth and airborne spores.
- Long-term solution: Minimizes future risks by creating an inhospitable environment for mold regrowth.
- Identifying sources of moisture.
- Evaluating the extent of contamination using tools like moisture meters or infrared cameras.
- Sealing off affected areas with plastic sheeting.
- Using negative air pressure machines to prevent spore spread during cleanup.
- Employing HEPA air scrubbers to capture airborne spores during remediation.
- Physically removing porous materials that cannot be salvaged (e. g. , drywall, insulation).
- Cleaning nonporous surfaces with antimicrobial solutions.
- Replacing removed materials.
- Addressing lingering moisture issues through dehumidification or repairs.
Comparing Mold Removal vs.
| Aspect | Mold Removal | Mold Remediation |
| Focus | Surface-level cleaning | Root-cause resolution |
| Long-Term Effectiveness | Typically short-term | Designed for long-term prevention |
| Methods | Cleaning products, scrubbing | Inspection, containment, filtration |
| Goal | Aesthetic improvement | Restoring a healthy environment |
Why Choose Mold Remediation Over Mold Removal?
While it might seem quicker and cheaper to opt for simple removal methods, neglecting remediation can lead to recurring problems that are more expensive and damaging over time. Professional remediation ensures that your property’s structural integrity isn’t compromised by hidden moisture issues—and protects your health by reducing exposure to harmful allergens and toxins released by certain types of molds.
Addressing both the visible symptoms (growth) and invisible causes (moisture) makes remediation a more thorough solution for long-lasting results. When dealing with a serious infestation, investing in professional help can save you time, money, and stress while safeguarding indoor air quality for years ahead.
Understanding the Difference Between Mold Removal and Mold Remediation
When addressing mold issues in your home or business, it’s essential to understand the distinction between mold removal and mold remediation. While these terms are often used interchangeably, they involve different processes and objectives. Knowing the difference can help ensure you take the right approach to tackle your mold problem effectively.
Key aspects of mold removal:
– Focuses on surface-level cleanup:
– Temporary solution:Removing visible mold does not address its source, meaning it may return if underlying causes like moisture or humidity are not resolved.
– DIY-friendly but limited effectiveness:Many homeowners attempt basic mold removal themselves using bleach or other cleaning agents. While this can provide a short-term fix, it may not eliminate hidden molds or spores.
Key steps in the remediation process include:
1.Inspection and assessment– Identifying areas of contamination and determining the extent of the problem.
2.Containment– Sealing off affected areas to prevent spores from spreading during removal efforts.
Air filtration– Using HEPA filters to capture airborne spores while reducing contamination risks.Mold removal– Physically removing infected materials that cannot be salvaged (e. g. , drywall, insulation).
5.Cleaning and sanitization– Thoroughly cleaning all affected surfaces with antifungal solutions to eliminate any remaining residues. 6.Addressing moisture issues– Resolving leaks or ventilation problems contributing to excess humidity. 7.Restoration– Replacing damaged materials like drywall or flooring for a complete restoration.
Key Differences Between Mold Removal and Remediation
| Aspect | Mold Removal | Mold Remediation |
| Scope | Surface-level cleanup | Comprehensive treatment |
| Addressing Root Causes | No | Yes |
| Expertise Needed | Often DIY-friendly | Requires professional expertise |
| Long-Term Effectiveness | Limited | High |
Why Does It Matter?
- If you’re dealing with minor surface-level growth caused by recent water damage, mold removalmay suffice as a quick fix.
- For extensive infestations spread across hidden areas (e. g.mold remediationis essential for permanent results.
By understanding their differences, homeowners can make informed decisions when addressing indoor air quality concerns related

Effective Steps for Professional Mold Removal Florida Services
When left untreated, mold can cause property damage and pose serious health risks.
Step 1: Inspection and Assessment
A licensed specialist typically performs this process.
- Visual Inspection:Identifying visible signs of mold growth on walls, ceilings, floors, or other surfaces.
- Moisture Mapping:Using tools like moisture meters or infrared cameras to locate areas with elevated humidity or hidden water damage.
- Air Quality Testing:Conducting air sampling to detect the presence and concentration of mold spores in the indoor environment.
The results from these assessments help create a tailored remediation plan for the affected area.
Step 2: Containment
- Isolating the Area:Setting up physical barriers such as plastic sheeting to seal off affected zones.
- Negative Air Pressure Systems:Installing HEPA-filtered ventilation systems that maintain negative air pressure within the containment area, ensuring that airborne spores cannot spread to unaffected spaces.
Effective containment is critical during mold remediation as it minimizes risks during cleanup activities.
The actual removal of mold involves eliminating both visible growth and airborne spores while addressing moisture issues that contribute to its development.
- Surface Cleaning:g. , glass or metal) can be cleaned using specialized antimicrobial solutions or detergents.
Professionals ensure all cleaning methods meet safety standards while reducing health risks associated with exposure.
Mold will return if underlying causes are not resolved.
| Cause | Solution Example |
| High Humidity Levels | Install dehumidifiers; improve ventilation. |
| Water Damage/Leaks | Repair leaking roofs, pipes, or windows. |
| Poor Drainage | Ensure gutters and downspouts are functioning properly. |
Addressing these factors ensures long-term prevention against future outbreaks.
Step 5: Drying and Dehumidification
Thorough drying is essential after cleanup to eliminate residual moisture contributing to fungal regrowth.
- Industrial-grade dehumidifiers.
- High-speed air movers placed strategically around wet areas.
- Moisture sensors ensuring optimal dryness levels before moving forward with repairs or final inspections.
Step 6: Final Cleaning and Verification
After completing removal efforts: 1. Surfaces are re-cleaned using advanced antimicrobial treatments for added protection. 2. Post-remediation air quality tests confirm spore levels have returned safely below threshold limits. Documentation (photos/reports) verifies work completion compliant with industry standards.
By following these structured steps professionally performed—homeowners find comprehensive solutions retaining healthier living environments once molds fully eradicated .
How to Determine If You Have a Mold Problem: Signs, Causes, and Solutions
Detecting mold issues in your home is critical to maintaining a healthy living environment. Mold can cause structural damage and pose health risks if not properly managed. Below, we explore the key signs of a mold problem, common causes, and actionable solutions.
Signs of a Mold Problem
- Visible Growth: Black, green, white, or brown spots on walls, ceilings, or other surfaces may be mold colonies.
- Musty Odor: A persistent earthy or damp smell often signals hidden mold growth.
- Health Symptoms: Allergic reactions such as sneezing, coughing, nasal congestion, headaches, and itchy eyes can be triggered by mold exposure.
- Peeling Paint or Wallpaper: Moisture behind walls can lead to bubbling or peeling finishes.
- Warped Surfaces: Floors or walls that appear warped might indicate water damage fostering mold growth.
Common Causes of Mold Problems
Understanding what leads to mold growth is essential for prevention.
- Leaky pipes
- Roof leaks
- Poorly sealed windows or doors
- Indoor humidity exceeding 60% creates ideal conditions for mold.
- Standing water from floods can saturate materials and promote rapid mold growth.
- Poor air circulation in areas like bathrooms or basements traps moisture and encourages bacterial growth.
| Cause | Description | Risk Level |
| Leaky pipes | Plumbing issues creating localized moisture | High |
| Roof leaks | Water intrusion from above | High |
| High humidity | Excess ambient moisture | Moderate to High |
| Flooding | Prolonged water damage | Very High |
| Poor ventilation | Trapped air allows condensation | Moderate |
Solutions for Addressing Mold Problems
- Inspect areas prone to moisture and address leaks promptly.
- Use dehumidifiers to maintain indoor humidity below 50%.
- Ensure proper ventilation in high-moisture areas such as kitchens and bathrooms.
- Perform air quality tests or hire professionals for comprehensive inspections if necessary.
- For small patches of surface-level mold (less than 10 square feet), clean with soap and water followed by an appropriate disinfectant.
- Call certified mold remediation specialists for extensive infestations.
Preventative Measures
- Install exhaust fans in bathrooms and kitchens to improve airflow.
- Regularly inspect plumbing systems for leaks or corrosion.
- Use waterproof coatings on basement walls where moisture intrusion is frequent.
By understanding these signs, causes, and solutions related to household mold problems, homeowners can act swiftly before serious damage occurs while ensuring healthier indoor spaces remain intact over time.
- Mold Removal Services Florida: Causes, Risks, and Prevention Strategies for Homes
- Comprehensive Guide to Mold Remediation Florida: Process and Benefits
- Effective Mold Remediation Florida Techniques for Completely Eliminating Mold
- Mold Remediation Florida: Protecting Your Health and Well-Being
- The Top 8 Questions to Ask Before Hiring a Mold Removal Florida Expert
- Comprehensive Guide to Mold Remediation Florida Homeowners Can Trust
- 6 Essential Steps to Expect During Mold Removal Services Florida
- Effective Mold Remediation Florida: Solutions for a Healthier Home
- Mold Remediation Florida: Effective Strategies for Eliminating Mold in Your Home